cleaning dell laptop cooling fan

You pay for an extended warranty with on-site service, let a technician deal with your periodic overheating problems, and get a new laptop in four years when your service contract runs out.Otherwise you often can’t. Laptop heat sink assemblies can be dead-end traps for lint, dust, and cat-hair which are impervious to canned air blasts from outside the case. While I cross my fingers and try every time, I’ve never resolved an overheating problem without removing the heat sink and cleaning the inside end of its fins.Getting at the plugged fins usually requires near complete disassembly. On my current laptop that means removing bottom cover, hard drive, wifi board, screen, center cover, keyboard, palm rest, optical drive, express card slot, sub-woofer, main board, heat sink assembly, and fan.Use the factory service manual. Supplement that with youtube videos and web sites. Note that your laptop may not match some pictures, due to option differences or running changes.Replace old thermal paste while you’re in there.
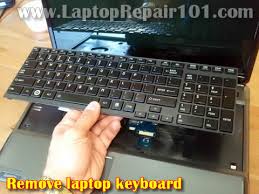
In this post I provide a few liquid spill repair tips. IMPORTANT: If you spilled something on your laptop you should stop using it right away, even if it appears to be running good. Right after the spill you should turn it off, unplug the power adapter and remove the battery. The laptop should be disassembled as soon as possible and all internal parts should be inspected for liquid damage. Liquid spills are very unpredictable. Even a small liquid spill can cause serious damage. IF YOU SPILLED A SMALL AMOUNT OF LIQUID Let’s say you spilled less than a teaspoon of liquid on the keyboard and it stopped working properly, but anything else works fine. In this case it could be enough to remove just the keyboard to evaluate the damage. Turn off the laptop, unplug the AC adapter and remove the battery. Now remove the keyboard and take a closer look underneath. Search for any liquid presence under the keyboard. – If you see liquid on the motherboard, you’ll have to disassemble the laptop completely for the further inspection.
– If the motherboard appears to be completely dry, do not disassemble it any further. Replace the keyboard with a new one. Hopefully replacing the keyboard will fix it. IF YOU SPILLED SUFFICIENT AMOUNT OF LIQUID If you spilled a lot of liquid on the laptop, turn it off right away. Unplug the power adapter and remove the battery as soon as possible. Most likely it will be necessary to remove the top cover and inspect the motherboard for the damage evaluation. Search for any liquid presence on the back side of the top cover and motherboard. If the motherboard is wet, remove it from the laptop and inspect the other side. HOW TO CLEAN UP LIQUID DAMAGE Wipe it out liquid with a soft cloth. Ideally, use an air compressor to dry the motherboard. Be very careful wiping the motherboard because it has too many small components. If you find any corrosion, you can clean it up with a toothbrush and 91%-99% isopropyl alcohol. Make sure the motherboard (or any other internal component) is completely dry before testing it.

IF YOU SPILLED SOME LIQUID ON THE SCREEN If you spilled liquid on the screen, wipe it out clean as soon as possible. The liquid might get inside the screen and damage it. In one of the previous post I explained how to clean the screen with liquid damage. Believe me, it’s not easy. But if it happens, just replace the whole screen. HOW TO ASSEMBLE THE LAPTOP AFTER CLEANING You’ll have to assemble it back together step by step.
replace fan in asus laptop First, assemble just main components: motherboard, CPU with the cooling fan and RAM modules.
cleaning wood floors vinegar waterNow turn it on and test basic image on the screen.
the best miele vacuum cleaner
If it turns on and you can see the image, start adding other parts one by one and test after each step. If the laptop doesn’t start after cleaning, take another look at the motherboard and other components. Maybe you missed a small damaged area. Try cleaning it again. If it still doesn’t turn on, most likely the motherboard (or other component) is damaged. HOW TO RECOVER DATA FROM HARD DRIVE Let’s say the laptop is dead and you cannot do anything to make it work.
fan of hp laptop makes noiseYou still should be able to recover personal data from the hard drive.
best way to clean wood floors martha stewartI assume the hard drive wasn’t damaged by liquid.
duct cleaning equipment hire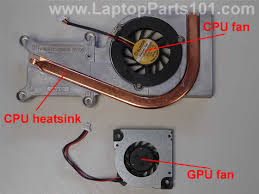
You can access data using a USB enclosure.Let’s face it, no one likes a dirty computer. Even those that are the most adamant that they don?t mind does, regardless of what they say. We all prefer to see our work displayed on the screen, not the dirt and dinner remains we have let build up. Who wants to be blinded by those nasty, greasy keys? And let?s not forget that cooling system, which can help your laptop perform better when kept clean. In a four part series we’ll take a look at how to clean various aspects of your laptop. To start with we’ll look at cleaning the vents and cooling system. This is most important because if your laptop’s vents get clogged up it won’t be able to cool properly and in turn won’t function properly. Later on in this cleaning your laptop series we will look at cleaning your keyboard and case, screen, and finally look at preventative maintenance. For cleaning your vent you need air. But, this air needs to be special, because it needs to be compressed in some way so that you can direct it to clean the vent.

The simplest solution to this is a ?can of air?. You can pick this up at most any store that deals with computers, including places like Office Max, Office Depot, Circuit City, Best Buy, and Walmart (to name a few). I usually buy online because I get the best prices online, but I also found that my University book store carries the can of air I like. I buy the ?I get plenty of use from it and when I buy online it is the best price that I have found, a plus for everyone. Generally speaking a can of air is a can of air. The difference will be in the mileage you get out of it. Buy what you want. In an ideal world I would have a small air compressor so I could have an endless supply of air and control over pressure, but I haven?t found the ideal compressor yet, so I buy can?s of air. There are some more general products that I recommend you have available when you clean your vents. First, a good, small flashlight. I use a MiniMagLite with LED kit. This allows me to see what I am doing with a nice compact flashlight that runs on one set of batteries for years.

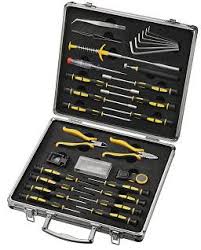
You can pick one of these up and most stores for about $15. Also, you will likely need a set of Electronics screw drivers to get to the fan. I find these to be generally handy, so I always have a set available. A good pair of tweezers or forceps can also help with cleaning the fan. I have a pair of curved forceps and they work wonderfully, and for only a few bucks at RadioShack, you can?t go wrong. The vents are the hardest part to give instructions for cleaning. Most laptops have the same keyboard and same screen from the cleaning perspective, but the vents are very different. On my computer, I can remove a few screws and have access to the vents to clean them, however on my previous computer you had to disassemble the entire computer just to get to the vets and fan fully. Don?t be discouraged, however, you can still do some cleaning on a computer like that. I recommend that if you aren?t sure how to disassemble to get to your fans and aren?t sure of the risks and how to safely do this, you should not try to disassemble your computer to clean the fan.

If your fan is really dirty and you can?t clean it personally, you might check into having the manufacturer or a local company clean your cooling system, so you don?t break it. A complete view of my computer with the vent open If you are ready to proceed start by turning the computer off and removing all power sources. You might want to hold down the power button for a few seconds once this is done to discharge all static buildup. Once that is done, you can proceed with cleaning your vents. It?s time to get out your can of air and one of your screwdrivers, or some other small, straight item you can use to pin your fan in place. I have found that allowing the fan to be spun around by the compressed air can kill your fan ? which would defeat the purpose of cleaning it. The procedure is simple. Pin your fan in place and remove all the dust. If you have access to the vents themselves, you should blow air through the vent from both directions. For larger debris it is better to remove it with the tweezers/forceps that you have available.

If not it could just make a big mess, not that it can?t be cleaned. Once the majority of the dust and debris is gone give it a good, through run through with your air, and clean the fan itself. I recommend that you don?t touch too many things inside your computer, just so you don?t risk damaging them. My fan is easy to remove, so I do that to help this process as well. My two big precautions here are important. First, be careful with the fan. Keep in mind that if you break or damage the fan, you might be unable to use your laptop until it is fixed. This is why you should be sure you are comfortable and capable of doing this before you start. Many fans can be replaced, but the irony is that many people that break fans don?t know how to replace them. Keep the fan pinned and if you handle it do so carefully. Next, DO NOT TIP YOUR CAN OF AIR. If you use the can of air at an angle, it comes out as a liquid, and is freezing cold. If you get this on your heat sink or fins (where the air goes through and where all the dust gets caught) you can destroy the whole assembly.