best way to clean wood floors martha stewart

Good Sunday morning and sadly the last day of the holiday weekend. It’s back to work and business as usual. I hope your holiday was wonderful and that you were able to get rested up a little before charging into the busy Christmas holiday preparations. My project today was made using the Impression Obsession Wrought Iron Fence and a wreath made using the Impression Obsession Holly Flourish and Martha Stewart Branch Punch. If you would like to see how I make my wreaths you can check out my Step by Step picture tutorial and Video tutorial over at Splitcoaststampers. You can also find three different wreath tutorials in the Tutorial section on my right side bar. I cut a 5.50” x 4.25” black piece of cardstock and attached it with ATG adhesive to a A2 cream card base. I applied ATG adhesive to the back of the music paper and attached to the black card base. I cut the fence using black cardstock and applied rolled up strips of double stick tape to the back and attached it to the card base.

I didn’t want the fence to be attached to the base so rolled tape allows for a tiny bit of dimension. The pictures below show me using 1/4” tape but I actually used 1/8” for the fence since the bars are very thin. I wanted to create a fairly small wreath that wouldn’t overwhelm the fence so I used a one inch circle for the base. I punched out lots of branches and cut the stem off right where the first two larger branches fork off so they would fit better for the smaller wreath. I attached the branches to the wreath base alternating the pattern-1 left, 1 right and 1 center and repeated it all the way around the base. Since this is such a small wreath the tightly arranged branches covered the inner circle of the wreath. I cut a couple holly flourish sections, cut them apart and applied 1/8” punched circles for holly berries. I applied red stickles to the berries for a touch of sparkle and set aside to dry. I created a small multi loop bow and attached it to the wreath using glue dots.
Once the bow was attached I arranged and attached the holly branches with glossy accents to fill in around the wreath. I tucked several longer pieces in around the bow to mingle with the streamers. I applied a good amount of glossy accents to the back of the wreath and attached it to the card base. I took a couple close up pictures for a better view. I thought the wreath would be the perfect embellishment to use with the iron fence and I love the music designer paper in the background. It reminds me of old-fashioned Christmas decorations. Before I close I wanted to take a minute to talk about a tool you may want to put on your Santa wish list. If you love collecting dies as much as I do then this small Dremel is the perfect tool to grind and smooth the poking out pieces of wire after you cut the dies apart. The Dremel is a fairly inexpensive tool that saves lots of time and energy versus hand filing off the pieces. I can’t tell you how many times I have hurt myself with those ugly little wire tips.

Impression Obsession Dies, Holly Flourish Martha Stewart Craft Punch, Branch Bazzill Card Shoppe Cardstock, Caramel Apple, 25 pk Bazzill Card Shoppe Cardstock, Licorice Twist, 25 pk Bazzill Card Shoppe Cardstock, Peppermint, 10 pk
clean fan dell xps Neenah Cardstock, Neenah Classic Crest Classic Cream, 25 pk
duct cleaning equipment hire Ranger Stickles, Christmas Red Elizabeth Craft Designs Susan's Garden Tool Kit Be Creative Tape, 5mm (1/4") Be Creative Tape, 3mm (1/8") Glue Dots, Mini (3/16") ATG Kit, Advanced Tape Glider Tonic Maxi 12 Inch Guillotine Paper Trimmer Sizzix Big Shot Express Sizzix Precision Base Plate for Thinlits Dies Ranger Non-Stick Craft Sheet EK Tools, Precision 5 Inch Scissors with Sheath Ranger Accents, Mini Glossy Accents

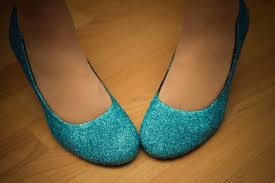
Ranger Accents, Glossy Accents Tim Holtz Tonic Non-Stick Micro Serrated Scissors Martha Stewart Scoring Board Scotch Double-Sided Foam Mounting TapeHow Do You Make Glitter Shoes? Make Any Pair of Shoes SparkleWhen I was looking for the perfect shoes for my wedding, I had difficulty finding something that I absolutely loved. I wanted something glittery, but I couldn't find the right pair in stores or online. Everything was sold-out or coming soon. Ready to give up, I decided to take matters into my own hands. How hard could it be to make glitter shoes? It couldn't be impossible because they existed—just not when I needed them to be. One of the first wedding decisions I made was that my something blue was going to be my shoes. So, some cute shoes + lots of sparkly glitter = adorable shoes that only look like a million bucks. Find Shoes You Love Love LoveThe beauty of covering shoes in glitter is that they don't have to be the same color as the glitter. So you can do this to revamp an old pair of heels or buy a certain shoe for a special project you have in mind.

If you don't want the full Dorothy Gale effect, you can put a light one-layer dusting of glitter on a matching shoe. Shoes that have a strap and buckle are difficult to glitter. Plus, the glitter will last a significantly shorter amount of time if constantly threaded through and buckled or just touched in general. This craft is ideal for ballet flats or simple heels. I used a plain black pair of heels by American Eagle from Payless Shoes. You're Gonna Need Glitter, and Lots of ItGlitter comes in many shapes and every color. Keep in mind that the large glitter specks will give your shoes more of a mosaic look. I like to use Martha Stewart's glitter and for my wedding shoes I mixed turquoise and blue glitters. Prepare to work in an area that will definitely get glittery! I like to work near my kitchen sink or on my back patio, both places that offer an easy clean up. Remember not to touch your eyes or face. What Type of Glue is Best?I love Martha Stewart's glitter glue! To be honest with you, I don't know how it's any different from Elmer's white school glue, but it comes in a cute bottle and has a brush built into the cap.
It goes on milky white and dries clear. I first tried it because I needed glue anyway and it was conveniently located right next to the glitter at Michael's. Work slowly, one section at a time, painting your glue on into a nice thin layer. Remember to cap and close your glue so it doesn't get thick or dry up. I also use a clear spray glue, which I'll explain in the next step. Both of these are available at Michael's. I paid less than six dollars for each and you will have a good amount left over for other crafts. Martha Stewart Glitter from Michael's Putting Glitter on Shoes: Bowl and Spoon MethodIf you're an expert crafter, especially in the ways of glitter, then you may have a different technique. Use whatever works best for you! If this is your first time, the spoon and bowl method makes it easy not to waste or spill your glitter and also makes for easy clean up. When it comes to the bowl and spoon, the bigger the better, but don't go crazy. Pour your glitter into a mixing bowl.

If you're mixing colors, be sure to mix them together thoroughly. Holding your freshly glued shoe over the bowl, scoop up some glitter with your spoon and drop it onto your section. Excess glitter falls back into the bowl for later. Once covered, tilt or tip the shoe to dump the remaining excess back into the bowl. After each glitter application, hold the shoe upside down and use your spoon to gently tap the bottom sole to free any more excess glitter. Work in sections until you get bored or no longer have a section to hold onto. It's impossible to get a full coat on every inch in one sitting. For my second and third layers, I use a clear spray glue that comes in a can. It's called Aleene's Tacky Spray and is also available at Michael's. Make sure you get the crystal clear kind. It works great because it's super sticky and since it's tacky, you have time between spraying and spooning for it to get sticky without drying out. (I also used this spray to seal my homemade wedding envelopes and boy does it hold!)

Spray on per the instructions on the can and repeat the previous steps. For a full three layers, you'll need at least three days for proper drying time in between glittering. Pay attention to seams or threads as they may need some extra attention to be covered up. Something Blue for My Wedding Day Using Tape when Making Glitter ShoesTape is great if you're doing designs and need to make straight lines or distinct sections. I use blue painters tape because it's sticky without being too sticky. I also like to use it during my second and third coats because I have less control of a spray than a brush and I don't want spray the inside of the shoe and have glitter inside my shoe forever. I like to tape off the inside lining to avoid this. In case you accidentally get some glitter inside that won't quite shake out, the tape step is great for getting it out. Just remember to peel out all the tape before wearing. Do You Have to Shellac Glitter Shoes?After your shoes are 100% glitter-tastic, it's time to seal them.
For this craft, I used Aleene's Final Step Spray Acrylic Sealer in a Gloss Finish. I purchased it at Michael's. Inspect your shoes for any imperfections or missed spots and fix as necessary. Make sure your shoes have dried overnight before sealing. Make sure your shellac is clear and glossy. Using a matte finish will dull your glitter and ruin your hard work! Spray shoes in a ventilated area and according to any instructions or precautions listed on the can. Allow at least 24 hours to dry, or longer if specified on the can. Once dry, wear them and be the talk of the town! My Glittery Wedding Shoes on DisplayClick thumbnail to view full-sizeThis is an awesome craft that requires time and patience! Doing a cute heart in a contrasting color is a cute idea, but you may want to opt for a glitter heart shoe clip instead. You can find them online or make your own using your new glitter skills. This way the heart is both 3-D and temporary! This craft is perfect for making costume shoes or just an awesome pair of clubbing shoes that don't cost an arm and a leg.