clean fan dell xps
This article provides information about fan noise and proper usage environment. Fans can become loud or have abnormal sounds due to: Proper ventilation can be one of the most important things for your system. Improper ventilation can increase fan noise and increase heat to the internal components to a degree that potentially can cause damage. It is generally recommended to use the system in a room temperature of 0°C to 35°C (32°F to 95°F) with a humidity level no greater than 90 percent. However for specific environmental usage temperatures for your system, refer to your User's Guide or Owner's Manual. Below are laptop and desktop specific ventilation tips: An out-of-date BIOS can cause loud fan noises by having an outdated temperature table for the system. Refer to update BIOS and follow the instructions to update the BIOS on your computer. Visit Dell Drivers and Downloads website and input your Service Tag to get updates for your computer. You may also perform Full System Diagnostics or Dell Quicktest on your computer.

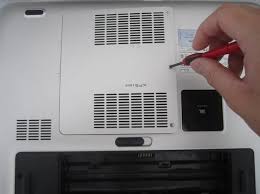
How to replace fan in Dell XPS M1530 posted in: 4. Dell | In this guide I explain how to clean up or replace the cooling fan assembly in a Dell XPS M1530. The fan can be accessed from the door on the bottom of the laptop and removing procedure takes only about 10 minutes. In my XPS M1530 it started making noise and had to be replaced. Turn off the computer, unplug the power adapter and remove the battery. Unscrew five screws securing the memory/fan cover and remove the cover. Remove six screws securing the heat sink assembly to the motherboard. Disconnect the cooling fan cable from the motherboard. Carefully lift up and remove the heat sink assembly. Remove four screws securing the fan to the heat sink. Lift up and remove the fan. The heat sink was clogged with dust and had to be cleaned up. You can use canned air to blow off dust from the heat sink. Before installing the heat sink assembly back on the motherboard, take a look at thermal grease on the processor and video chip.

If thermal grease dried out, it has to be replaced. Remove old grease from the heat sink using a piece of paper towel soaked in 99% alcohol. Do not remove thermal pad. It can be reused. Using same paper towel remove old thermal grease from the processor and video chip. Apply a small drop of fresh thermal grease on the processor and video chip before installing the heat sink assembly. I’m using Shin-Etsu gray thermal grease. In the next post I explain how to remove sceen from a Dell XPS M1530 laptop. Dell XPS M1530 Fan Replacement If your computer is running hot then the fan my be broken or dirty. This guide will help you locate and remove the fan so you can clean or replace it. Turn the computer upside down with the battery facing you. Turn the computer off and disconnect the charging cable from the computer. Failure to unplug the charging cable may result in electric shock. Push the switch as far to the right as possible to unlock the battery.

The indent should provide enough grip to remove the panel with ease. First, unscrew the six screws that are holding down the fan and heat sink with a Philips #1 screwdriver. Then use a Phillips #1 to remove the single screw near the bottom of the heat sink. Six Silver Chrome 5.8mm Phillips #1 screws Remove the four screws that are holding down the CPU (the four to the top left that form a rectangle in this image) first. Unscrew them in an X pattern (eg. top left screw, bottom right screw, top right screw, bottom left screw) to minimize risk of harming CPU. Carefully lift the fan and heat sink from the laptop. Be careful not to pull up too hard, because the power pin is still connecting the fan to the laptop. Use your fingers or a spudger to remove the power pin connecting the fan to the laptop by pulling it straight up off the motherboard. Remove the fan and heat sink from the laptop. When installing the new heat sink, do not forget to replace the thermal paste underneath the heat sink.

See iFixit's Applying Thermal Paste guide for further instructions. Flip over the heat sink to remove the four 3.2mm Phillips #000 screws connecting the heat sink to the fan. Four 3.2mm Phillips #000 Carefully separate the fan from the heat sink. You may need to clean the fan and heat sink with an air duster, especially if enough dust have accumulated onto it. To reassemble your device, follow these instructions in reverse order. One other person completed this guide. Past 24 Hours: 1 Past 7 Days: 7 Past 30 Days: 22How to disassemble Dell XPS 17 L701X In the following guide I explain how to disassemble a Dell XPS 17 L701X laptop. During the disassembly process I’ll go though the following major steps: STEP 1-8: Accessing both RAM modules. Removing the hard drive and optical drive. STEP 8-14: Disconnecting and removing the palmrest. STEP 15-20: Removing the keyboard. STEP 20-26: Removing the bottom cover. STEP 27-28: Accessing and removing the cooling fan.

Accessing the DC power jack. Before you start taking it apart make sure the computer is turned off. Unlock and remove the main battery. Remove the service cover on the bottom. Under the service cover you can access both memory modules and hard drive. Remove four screws securing the main hard drive mounting bracket. Slide the hard drive to the shown direction in order to disconnect it from the motherboard. Remove the primary hard drive. Remove one screw securing the optical drive. Pull the optical drive and remove it. UPDATE: you’ll find three screws located under the DVD drive. These screws must be removed before you can remove the palmrest assembly in the step 8. Remove for screws securing the secondary hard drive mounting bracket. In my Dell XPS L701X I had only one hard drive installed. Remove the mounting bracket. Start removing the palmrest. UPDATE: three screws located under the DVD drive (removed in STEP 6) has to be removed in order to remove the palmrest assembly.

Insert a piece of plastic (I’m using the guitar pick) under the palmrest and lift it up. Continue removing the palmrest with your fingers.The touchpad cables are still connected to the motherboard. Before you can remove the palmrest completely it’s necessary to disconnect the touchpad cables. The palmrest has been separated from the base. Place the palmrest so you can access the touchpad cables. In the following two steps I explain how to unlock connectors and release cables. In order to unlock the connector you’ll have to lift up the right side of the cable retainer. The retainer will open up at a 90 degree angle. On the following picture the connector shown in the UNLOCKED position. Now you can pull the cable from the connector. Disconnect the second touchpad cable. Now you can remove the palmrest from the laptop completely. After the palmrest removed you can access the CMOS battery. Here’s the bottom side of the palmrest.