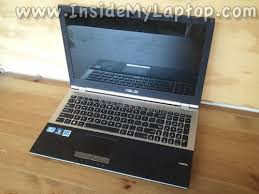
replace fan in asus laptop

I saw this on PC Advisor and thought you should see it too. Like PCs, laptops use fans to blow air on components that would otherwise overheat. Typically a laptop will have one or two fans cooling the main processor and graphics chip or chipset. Many designs use a so-called heatpipe system to draw heat away from these components, with a single fan cooling a heatsink which is attached to the heat-pipes. The heatsink will have lots of 'fins' to dissipate the heat, and dust can also build up between these fins, reducing cooling power enormously. What you need to know is that the fans in a laptop are even more critical than in a PC. With everything packed in to make the laptop as slim as possible, there's very little room for airflow. And that means that even small amounts of dirt and dust can hamper a fan's effectiveness. The first signs of a clogged up fan are random Windows crashes as the system overheats. Or, if the vents are blocked with dust rather than the fan blades, you'll notice the fan running constantly or at a high speed than usual.

You can try various techniques, with the easier methods having a lower success rate. If you're not confident using a screwdriver to dismantle your laptop, grab a can of compressed air or try a camera lens air duster if you have one.
best car vacuum cleaner 12vVacuum cleaners are not recommended: they're quite ineffective at removing dust and they can also cause a build-up of static electricity which you don't want around a laptop.
air duct cleaning cost seattle Obviously make sure the latop is powered off before you start.
best way to clean grease off stove hoodInsert the nozzle of the air duster into the vents (or as close as you can get it) and start blowing the dust out. Try and stop the fan blades turning using a long plastic object - you'll have a hard time removing dirt from a spinning fan.
For those that are happy to wield a screwdriver, turn off the laptop, flip it over, and remove the battery. If there is one, remove the plastic or metal panel in the base and hopefully it will reveal the fan. Your success here will depend entirely on your laptop model. If you don't see the fan at all, you'll have to go one step further and remove other parts. There are many YouTube videos that show how to take laptops apart: just search for your make and model. Now it's time to blow out the dust, something you might want to do outside. The best way to do this is with a can of compressed air. If using compressed air, press the button in short bursts from lots of different angles. Don't get too close with the nozzle and stop the blades moving as per method 1. You'd do well to unscrew or otherwise remove the fan at this point and check for any other dirt clogging up the heatsink or air vents. After you've blown out all the dust, replace the panel and battery and you should find that the fan runs much quieter when you power the laptop on again.

The plastic bearings in laptop fans don't last forever and if your fan is emitting a loud whine (which it didn't when you first got the laptop) it's probably time to replace it. Here, ebay is your friend. It helps if you have a popular make of laptop: we found a lot of Dell, HP, Acer and Asus fans but you'll be able to search for your exact laptop model. It helps if you have your laptop's fan for reference, and check with the seller if the photos are of the actual item if you're not sure. Back to Answers Index the fan in my asus x53e laptop has stopped working awhile ago. ive noticed it near the the end of the semester where the left side of my laptop became really hot and then checked to see if there was air flow on the side. it still boots up and works on different battery options but im scared that putting it on high performance will do permanent damage. is there a guide to replace the fan Your first mistake was using a laptop with a fan failure. Until you replace the fan, STOP using the laptop.
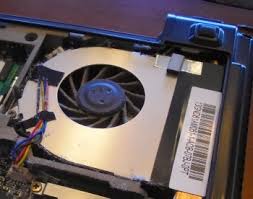
You're going to find yourself with more problems then it already has if you keep using it. You're going to need to tear the whole laptop down, following this guide on the procedure. The fan can be found here, and many other places who sell it. If you do not like this vendor for the fan, the part number is ksb06105hb. You will find metal and plastic versions, but you really want the metal version for this laptop, due to the weak cooling system that seems to do better at trapping heat instead of getting rid of it. Past 24 Hours: 2 Past 7 Days: 10 Past 30 Days: 43In this guide I will explain how to disassemble an Asus laptop. In my case the model number is: Asus . Make sure it’s turned off. Unlock and remove the battery. Remove three screws securing the service cover on the bottom. Lift up and remove the cover. Under the service cover you will find the hard drive and both RAM modules. Remove two screws securing the hard drive.

Slide the hard drive to the left and disconnect it from the motherboard. Remove one screw securing the optical drive. Pull the drive to the left and remove it. Remove all marked screws from the bottom. I am using a guitar pick to separate the top cover assembly from the bottom case. Start removing it in the palm rest area. Lift up the top cover as it shown on the following picture. Be careful, there are two cables connecting it to the motherboard. The top cover is mounted under the hinge cover. Push on the hinge cover with your thumb and pull the top cover away. When you install the top cover back in place you’ll have to push it under the hinge cover first and after that the rest. Before you remove the top cover/keyboard assembly completely, you’ll have to disconnect two cables. First, unlock each connector by lifting up the cable retainer (green arrows). Second, pull both cables out (yellow arrows). On the following picture you can see both connectors in the unlocked state from a different angle of view.

Now you can remove the top cover assembly completely. Here’s a view on the bottom side of the top cover. When the top cover removed, you can access the CMOS battery. In order to remove the motherboard, it’s necessary to remove the wireless card first. Unplug both antenna cables from the wireless card. Remove two screws securing the wireless card and pull it out of the slot. Remove three screws securing the motherboard. Here’s how to disconnect small connectors. Simply unplug the male part connected to the cable from the female part on the motherboard. Do not pull by the wires. Unplug it by the edges on the male part. Here’s how to disconnect the display cable. Pull up by the black belt attached to the top of the connector. If you have a SD card or cover installed in the card reader, you’ll have to remove it. Start removing the motherboard from the laptop case as it shown on the following picture. Lift up the right side and carefully remove it.