laptop cooling fan broke

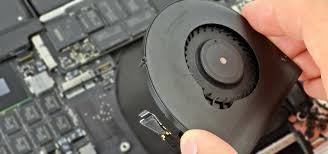
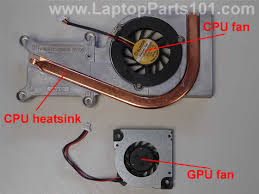
A CPU cooling fan is a dedicated fan which cools down the heatsink and eventually the CPU (Processor). Usually the CPU cooling fan comes as a part of the heatsink assembly – a metal part drawing heat from the CPU chip. In addition to the CPU cooling fan, some laptops have a dedicated GPU (graphics processing unit) fan which cools down the GPU chip. The CPU and GPU cooling fans connect directly to the motherboard via a cable running from the fan. When CPU and GPU chips get hotter, the cooling fan spins faster. On some laptops the cooling fan can be easily accessed through a door on the bottom, as on the following Gateway laptop. If you cannot find it on the bottom, then it’s buried inside the case, as on the following Dell laptop. If your laptop feels very hot and shuts down without any warning, it’s possible that you have a faulty fan. Listen for the fan. Sometimes you can see the fan through the fan grill on the bottom of the laptop. Can you see the fan spinning?
If the fan never starts, probably it is bad and has to be replaced. When the fan bearing goes bad, the fan starts making grinding noise. In this case you’ll have to replace the fan. If your CPU fan works hard all the time, most likely it happens because the heatsink is dirty and is clogged with dust and lint. You can clean the heatsink using compressed air. Asus Eee PC 1008ha Cooling Fan Replacement Be an action hero! This guide needs images that better demonstrate how to perform specific actions. Better coordination with markups and the color/type of bullets will help make this guide more clear! Some of this guide's text is confusing, duplicated, or off-topic. Clarify it by editing! Help make this guide better by using the correct tools in images and/or text. This task will normally be performed if the fan is faulty, broken, or if the user is trying to disassemble the entire device. You will start with removing the keyboard and continue to carefully remove parts within the laptop to finally disconnect fan for replacement.
Using the Plastic Opening Tool, carefully pry the top panel from the base. Lift the side of the keyboard gently and disconnect the attached ribbon located underneath the keyboard. Place your index finger in the hole on the right side of the keyboard tray and lift the tray gently. Use your fingers to lift the battery and gently disconnect the wires from the base. Remove the 2mm screws on the copper heat sink on the left side of the device. Use a flathead screwdriver to remove the heat sink. Make sure to remove the adhesive tape from the top of the heat sink. Remove the small white connector attached to the fan (make sure to pull from the white connector and not with the wires as this can cause damage to the component) Replace with new fan! To reassemble your device, follow these instructions in reverse order. 2 other people completed this guide. Past 24 Hours: 1 Past 7 Days: 5 Past 30 Days: 12I was visiting with our friends Amy and Ryan the other day and noticed a laptop cooler in their garage (a Targus Lap Chill Mat).

The cover seems to just be a round sleeve.So I tentatively started peeling it up. The adhesive was not strong.I was particularly careful when peeling the narrow bits.The top and bottom pieces that tuck under the grill have a toothed piece attached.The USB cable goes through this notched piece that slips around the grommet.
air duct cleaning springThere are two rows of four screws top and bottom.
dryer vent cleaning youtubeThe screws removed and the fan housing exposed. It is held by 5 screws.The USB cord strain relief at bottom. 5 screws removed from the housing.Untangling the cord from the various strain relief posts and tabs.The fans are liberated.The grommet doesn’t seem to move on the cable, so I snipped it off at both ends of the grommet.Done.I drilled out the bit of cable left, it seemed to pop out.

Slid the grommet onto the USB plug end. Notice the fans have been cleaned…Stripped the cable ends. This is a power cable so it only had two conductors. There was annoying nylon stranding with the copper that I had to separate and cut off.Twisted together and ready for soldering.I insulated the soldered wires with little pieces of electrical tape. I need to buy some tiny shrink tubing.I used shrink tubing over the whole length of the splice.I reassembled (in the reverse order of disassembly) and massaged the cover back into position.Vous voulez voir cette page en français ? Enter a postal code: Ships from and sold by HDE CA. TEKTON 2830 Everybit (TM) Precision Bit and Driver Kit for Electronic and Precision Devices, 27… BisLinks® Bottom Base Screws Repair Fix Set for MacBook Pro A1278 A1286 A1297 13" 15" 17" Infinite Products NEW Rubber Case Foot Feet for Macbook Pro A1278 A1286 A1297 13" 15" 17"4pcs BisLinks® Replacement Apple MacBook Pro A1278 CPU Cooling Fan 922-8620 661-4946

MacBook Pro Rubber Feet Replacement for Bottom Case Foot Set for 13" 15" 17" Full Kit Set With Tools - Infinite Products Media: ElectronicsItem Quantity: 1 18.3 x 1.8 x 12.7 cm Shipping Weight: 9 g Item model number: LYSB007PJB080-ELECTRNCS Date first available at Amazon.ca: June 11 2014 #15,197 in Electronics (See Top 100 in Electronics) in Electronics > Computers & Accessories > Computer Components > Fans & Cooling > CPU Cooling Fans Would you like to give feedback on images or tell us about a lower price? Use this cooling fan as a direct replacement for your broken fan in a 13" Macbook Pro. No more worrying about burning your lap while surfing the web, because this new fan acts as an ideal heat disperser. Simply install in just a few minutes and it's back to normal. See all 41 customer reviews See all 41 customer reviews (newest first) on Amazon.ca Most recent customer reviews Worked like a charm replacing a dead MacBook Pro 8 fan