hp 2000 laptop fan not working
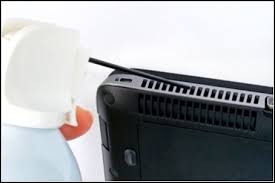
This document pertains to HP notebook PCs, also referred to as laptops. This video shows how to reduce heat inside your laptop computer Click here to see this video in full screen on YouTube. Symptoms of heat issues and causes of excessive heat Windows 10, 8, 7, Vista, XP Windows 95, 98, and ME Step 1: Removing dust and lint by cleaning vents Figure : Dust accumulation Figure : Dust accumulation around a fan Figure : Side vents Figure : Bottom vents Step 2: Ensuring proper space for ventilation Step 3: Updating the BIOS After releasing a laptop, HP regularly provides updates for the BIOS and other components. Check for BIOS updates and install them using instructions in the HP support document Updating the BIOS. Step 4: Using HP CoolSense technology HP CoolSense technology is a feature in some HP notebook (laptop) computers that combines hardware, software, and mechanical design to dynamically manage the temperature of your laptop computer.

HP CoolSense uses a motion sensor in your laptop to sense when your laptop is being used in a stationary or mobile setting, and automatically adjusts the laptop performance and fan speed to keep the computer cool. You can set HP CoolSense software to your specifications. For more information, see HP Notebook PCs - HP CoolSense Technology. Step 5: Placing the notebook in a cooler room Step 6: Testing for hardware failure Testing for Hardware Failures (Windows 10, 8) Testing for Hardware Failures (Windows 7) Checking Your Notebook PC Using the HP System Health Scan for laptops running Windows Vista Fan Is Noisy and Spins Constantly, PC Is Warmer than Normal Tips for Using, Carrying, and Protecting Your HP Notebook PCIn this post I explain how to disassemble HP 2000. I will remove main laptop components and show how to access area under the top cover. I’ll go through the following major disassembly steps: STEP 1-7: Accessing RAM. Removing the hard drive and DVD drive.

STEP 8-15: Disconnecting and removing the keyboard. STEP 16-19: Removing the top cover assembly. Accessing the internal components. Before you start the disassembly process make sure the computer turned off. Unlock and remove the battery. Remove one screw securing the memory cover. Lift up and remove the cover. Under this cover you can access both memory slots and wireless card. It’s not necessary to remove them for the purpose of my disassembly so I’ll leave them connected to the motherboard. Remove one screw securing the hard drive cover. Remove four screws securing the hard drive mounting bracket to the base. Disconnect the hard drive cable from the motherboard. Simply lift up the connector by the black belt located on the top of the connector. If you are replacing or upgrading the hard drive you’ll have to disconnect the cable and mounting bracket. The mounting bracket secured by four screws (two on each side). Transfer the bracket and cable to the new hard drive.

Remove one screw securing the DVD drive. Pull DVD drive to the left and remove it. Remove one screw securing the keyboard. This screw is located close to the wireless card. The keyboard is secured to the top cover by five latches. Push on the left latch with a small screwdriver and at the same time lift up the keyboard a little bit so the latch doesn’t lock back in place.
easy way to clean roman blinds While lifting up the left side of the keyboard, push on the next latch and so on.
air duct cleaning business startup After you unlock all latches you should be able to lift up the top side of the keyboard.
best hardwood floor cleaner and wax
Be careful, the keyboard still attached to the motherboard. Turn the keyboard upside down and place it on the palmrest. Now you can access the keyboard connector. In the next two steps I explain how to unlock the connector and release the keyboard cable. The keyboard connector has a moving part – brown locking tab.
dryer vent cleaning kits Carefully lift up the left side of the tab with your fingernail.
best method to clean couchIt will open up at a 90 degree angle.
best method to clean sofa On this picture the connector shown in the unlocked position. Now you can pull cable from the connector. Lift up and remove the keyboard. Remove all screws from the bottom. Remove one screw securing the top cover assembly.

Disconnect three cables (from left to right): – Power button cable. – Touchpad button board cable. Start separating the top cover assembly from the bottom cover. You can use a piece of soft plastic (I’m using the guitar pick) for that. Insert it between the top cover and bottom cover and move along the side. Continue removing the top cover with your fingers. Here’s the bottom side of the top cover assembly. Here you can access the power button board and touchpad. When the top cover removed you can get access to the following internal components: In HP 2000 the DC jack attached to the cable. If the jack fails, you can unplug it from the motherboard and replace with a new DC jack harness. In one of the previous guides I explained how to replace HP 2000 LCD screen. You can support my work! Laptop power goes on but screen shows nothing [Solved/Closed] I have been recently been experiencing problems with my HP Pavilion DV 2000 laptop.

For sometime the power button light will go on—but nothing will appear on the screen? My laptop screen wont turn on but has power Laptop on but no display Laptop power light on but nothing happens Sony Vaio black screen. HP laptop lights up, but screen stays black Laptops power goes on but screen shows nothin [Solved] Toshiba laptop: power works but screen won't turn on. May 17, 2009 at 12:28 PM If the fan spinning when switch on the laptop and no display this can be a problem with the memory. Try removing it putting it back and also if you have 2 memory cards try with one. Try connecting to a external monitor. If it works on a external monitor problem is with the inverter or LCD flex cable. Mar 29, 2010 at 04:58 PM just turn it of and slam it on the floor about 3 times and it will work promise I did that to mines and it worked :D Sep 1, 2009 at 07:11 AM Finally I found someone else with my problem, I got a HP pavilion dv6700 with nvidia graphics and windows vista.

It worked fine until today when it just wouldnt show me crap on the screen, ive tried searching for it on this forum but all I found was press ctrl+alt+delete and do lotsa stuff... BUT HOW THE H£LL can I do that when I cant see anything and the computer wont even respond to anything else than the power button? The fan is going and all the stuff on my keyboard is lighting up like it should, but the screen is jsut like it was before I turned on the computer. I guess its my graphics card thats against me on this one. Theres obviously no warranty on it and I dont want to buy a new graphic card when I dont even know if thats the problem. So if anyone could help me I would be forever happy. Apr 10, 2010 at 02:38 PM Hi I have had this computer for almost 6 months. I can log in and when I get on there is nothing except the cursor no desktop. no toolbar...nothing how can I fix this? Dec 12, 2009 at 03:52 PM Chronology of my terrible horrible no good very bad experience with HP dv2000.

4 months after I purchased it: 1- Overheat to the degree I can't leave it on my lap. 2- The battery died cell after cell until I had no battery at all and need to be hooked up to the power all time. 3- The charger cable got ripped off from the inside. 4- The hard drive got burned making me lose important data. 5- Another hard drive got burned with the same story. 6- The picture started to act funny, maybe because of the VGA is acting up and starting to die slowly. 7- DVD drive laid to rest forever. 8- Finally the VGA died giving me a black screen, and even the BIOS doesn't show up. One year after purchasing the late HP dv2000, I returned to my three years old couple of Laptops "warriors" Dell inspiron that still love me even after I dropped them for a terrible horrible no good very bad HP dv2000. I took a promise on my self to NEVER EVER purchase the following products: Nov 1, 2009 at 06:56 PM The HP DV series laptops and some others have known motherboard issues and if you are lucky and have an affected model they will replace the motherboard free of charge but only HP can tell you if your model is affected by this.

If not the laptop board for the DV series runs from 169.00 to 249.00 depending on your model Aug 16, 2009 at 07:04 PM HP's pop-up window stated that my DV6663US (Vista Ultimate 64) laptop needed a bios update. I foolishly believed them, followed the instructions and installed the update, which destroyed the laptop. The laptop was working, but now nothing works and HP says they aren't responsible because it is out of warranty, but for the price of a new laptop, they will install a new motherboard. WARNING: Do NOT take HP's statements at face value. HP may have needed to destroy my laptop in order to inspire me to buy a new laptop, but it won't be an HP. Apr 19, 2009 at 07:53 PM Okay, HP must have problems with this model, because I am having the same problem! This laptop shouldn't be having problems this soon, this stinks! Nov 18, 2009 at 09:13 AM For DV2000 Laptop please contact HP - they have a recall going on. They will replace the motherboard for free. I told my friend and he got his done.