replace fan dell laptop

Delivery to pincode 400001 - Mumbai within 1 - 2 weeks. Sold and fulfilled by iBhejo (4.6 out of 5 | 3,772 ratings). Dell Inspiron 15R N5010 Laptop Keyboard Picture is the actual Fan! The Original New and Top Quality CPU Cooling Fan perfectly fit your laptop. Please check the images and description carefully. Description: Condition: Genuine and NEW !! Model:MF60120V1-B020 -G99 Power: DC 05V 0.36A 3 PIN 3 Connector Warranty: 12 months Compatible Laptop Models: Dell Inspiron 15R N5010 M5010 Series Laptop Package content: 1 CPU cooling fan(Heatsink is not included) Product Dimensions10.2 x 9.7 x 2.8 cm #15,942 in Computers & Accessories (See top 100) in Computers & Accessories > Components > Fans & Cooling > CPU Fans Date First Available8 August 2014 Would you like to update product info or give feedback on images? Dell Inspiron 15R N5010 Laptop CPU Cooling Fan (Black) Gadget Hero's 30g Thermal Grease Paste Heat Sink Compound for CPU & Chipsets.
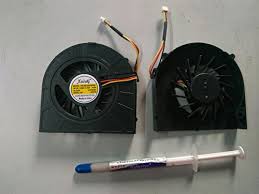
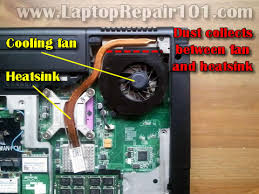
3 Month Warranty Dell Inspiron 15r N5110 Series Laptop Cpu Cooling Fan Cooler Master V1 IC VALUE THERMAL COMPOUND See all 12 customer reviews See all 12 customer reviews (newest first) on Amazon.in Most Recent Customer Reviews Not compatible with DELL inspiron n5050 fan quality is low i am not expected that Look for similar items by category Computers & Accessories > Components > Fans & Cooling > CPU Fans DellDell XPS L501Xshocking protectionmad Ok, you can start the stress test now, ready here Installed CPUID Hardware monitor, a neat program, and discovered something scary. At idle, core temps were intimidating, 50-60 Cº, doing....nothing. So I said, whoah, let's try to do something hardcore, like...playing a Youtube video in Firefox, here are the results: Playing Youtube video test80-90 Cº after a minute playing a Youtube video in Firefox? No way, guess its time to clean off the dust and replace thermal paste. State-of-the-art dust cleaner, living on the edge heh

In my case, I only checked this wonderful video occasionally to know how to do the tricky parts for the XPS L501, worth a check, great explanation from the recorder. Check the following pics to see how the diassemble process took place, if you're curious :P. After removing back plate and laptop screen, you face the plastic cover: Hard drive, Wireless and RAM out The root of all the problems, the unfamous Dell XPS L501 fan...you can tell that is not top-notch quality by the way it looks.
removing dust from laptop fanAnyway, I cleaned it as best as I could, removing a lot of dust in the process.
vacuum cleaner best buy upright After removing the plastic covering case, the motherboard shows up.
what is the best way to clean louvered blinds
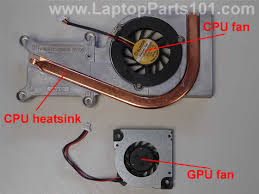
As you can see, heat sink is on the left. Intel i7 is right in the center and Nvidia GPU is on the left. After removing the heat sink, you can see that the fabric thermal paste from Dell is long gone...dried out and completely uneven distributed along the chip surface. i7 crying out loud for thermal paste replacement Same goes for the GPU... A close look to the heat sink contact surfaces also shows up a terrible mess with the thermal paste
best vacuum cleaner at target Contact point with i7
best upright vacuum cleaners 2015 Contact point with GPU, at least heat pads seem to be alright...
fresh air duct cleaning reviews Now the boring part: cleaning both the heat sink and the chip surfaces from any remnants of the old thermal paste.

My recommendation would be to buy a proper solution for this, like the Arctic Silver Arcticlean Thermal material Remover & Surface Purifier or something similar. If you don't have anything similar, use pharmaceutical alcohol and some lint free cloth to clean up the mess. Do not use any other thing, you will definitely cause more problems than you already have. Check the Artic guide about how to do this if you ever done it before. After careful (and boring) cleaning, the best I could come up with can be seen here Intel i7 almost clean Nvidia GPU quite clean too Not perfect, but should do the trick. Now the funny part, I bought Artic 5 silver thermal paste, already used that one in my gaming rig and it really works like a charm. Heat sink contact surface with i7 And the GPU part I didn't do anything with the heat pads, the seemed ok to me, but you can buy some and replace them if you think is needed. Everything back in order Windows 7 idle test after replacement
Windows 7 playing Youtube video While in idle temperatures seem to be pretty much the same, the "load" test has dropped dramatically, almost 20ºC!! Let's see what we get in Linux x86... Linux playing Youtube videoKeeping your HP laptop cool is essential in protecting your company's files. Goodshoot/Goodshoot/Getty Images Hewlett Packard laptops are highly portable, allowing busy professionals to easily transport an entire file cabinet’s worth of data from one job site to another – but as with any laptop, this feature can prove to be its undoing. Because their compact size hinders airflow, HP laptops are highly susceptible to overheating. If your Hewlett Packard’s fan isn’t functioning properly, it’s important to waste no time in replacing it. 1. Shut down your HP laptop, unplug its power cord and disconnect all peripherals. 2. Discharge built-up static electricity from your body by touching an unpainted metal object. 3. Place a soft cloth, such as a towel, on a flat surface.
Close your laptop’s display panel and place it upside-down on the cloth. 4. Remove the screw or screws from the battery cover with a Phillips screwdriver. Depress the locking tabs and lift out the battery assembly. 5. Remove the screws from the hard drive cover with a Phillips screwdriver and lift off the cover. Unplug the cable that connects the hard drive to the motherboard, if applicable, and slide the drive out of its bay. 6. Remove the screws that secure the CMOS battery and memory module panel. Lift off the panel and remove the battery and modules. 7. Remove the keyboard cover screws with a Phillips screwdriver. These are located in some or all of the following places: the two corners of your laptop’s bottom, directly under the center of the keyboard, in the memory module bay and in the battery compartment. 8. Turn the laptop over and open the display panel. Using a flat-head screwdriver, pry off the upper section of the keyboard flange. This is the piece that’s closest to the display panel.
9. Remove the upper keyboard screws, which are located over the “F” keys. 10. Lift the keyboard just enough to reveal its ribbon cable connection to the motherboard. If the ribbon cable is secured with a locking flap, lift the flap and gently pull the cable from the motherboard socket. If the connector features locking tabs, depress and hold in the tabs as you pull the cable from the socket. Lift out the keyboard. 11. Locate the LED board socket, which is labeled, on the motherboard. Grasp the connector with your thumb and forefinger and carefully unplug the wire that connects the LED board to the motherboard. Do the same for the video display, power button, webcam, two antenna connections and touchpad, if applicable. 12. Remove the screws from the display panel’s hinges with a Phillips screwdriver. Hold the panel with your free hand to prevent it from falling when the last screw is removed. 13. Lift off the top cover assembly and unplug the cables that connect the USB ports, power jack and audio jacks to the motherboard.