hp 2000 laptop fan

In this post I explain how to disassemble HP 2000. I will remove main laptop components and show how to access area under the top cover. I’ll go through the following major disassembly steps: STEP 1-7: Accessing RAM. Removing the hard drive and DVD drive. STEP 8-15: Disconnecting and removing the keyboard. STEP 16-19: Removing the top cover assembly. Accessing the internal components. Before you start the disassembly process make sure the computer turned off. Unlock and remove the battery. Remove one screw securing the memory cover. Lift up and remove the cover. Under this cover you can access both memory slots and wireless card. It’s not necessary to remove them for the purpose of my disassembly so I’ll leave them connected to the motherboard. Remove one screw securing the hard drive cover. Remove four screws securing the hard drive mounting bracket to the base. Disconnect the hard drive cable from the motherboard. Simply lift up the connector by the black belt located on the top of the connector.
If you are replacing or upgrading the hard drive you’ll have to disconnect the cable and mounting bracket. The mounting bracket secured by four screws (two on each side). Transfer the bracket and cable to the new hard drive. Remove one screw securing the DVD drive. Pull DVD drive to the left and remove it. Remove one screw securing the keyboard. This screw is located close to the wireless card. The keyboard is secured to the top cover by five latches. Push on the left latch with a small screwdriver and at the same time lift up the keyboard a little bit so the latch doesn’t lock back in place. While lifting up the left side of the keyboard, push on the next latch and so on. After you unlock all latches you should be able to lift up the top side of the keyboard. Be careful, the keyboard still attached to the motherboard. Turn the keyboard upside down and place it on the palmrest. Now you can access the keyboard connector.

Lift up and remove the keyboard. Remove all screws from the bottom. Remove one screw securing the top cover assembly. Disconnect three cables (from left to right):
air duct cleaning services in ct – Power button cable. – Touchpad button board cable. Start separating the top cover assembly from the bottom cover. You can use a piece of soft plastic (I’m using the guitar pick) for that. Insert it between the top cover and bottom cover and move along the side. Continue removing the top cover with your fingers. Here’s the bottom side of the top cover assembly. Here you can access the power button board and touchpad. When the top cover removed you can get access to the following internal components: In HP 2000 the DC jack attached to the cable. If the jack fails, you can unplug it from the motherboard and replace with a new DC jack harness.

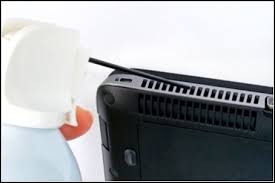
In one of the previous guides I explained how to replace HP 2000 LCD screen. You can support my work!This document pertains to HP notebook PCs, also referred to as laptops. This video shows how to reduce heat inside your laptop computer Click here to see this video in full screen on YouTube. Symptoms of heat issues and causes of excessive heat Windows 10, 8, 7, Vista, XP Windows 95, 98, and ME Step 1: Removing dust and lint by cleaning vents Figure : Dust accumulation Figure : Dust accumulation around a fan Figure : Side vents Figure : Bottom vents Step 2: Ensuring proper space for ventilation Step 3: Updating the BIOS After releasing a laptop, HP regularly provides updates for the BIOS and other components. Check for BIOS updates and install them using instructions in the HP support document Updating the BIOS. Step 4: Using HP CoolSense technology HP CoolSense technology is a feature in some HP notebook (laptop) computers that combines hardware, software, and mechanical design to dynamically manage the temperature of your laptop computer.

HP CoolSense uses a motion sensor in your laptop to sense when your laptop is being used in a stationary or mobile setting, and automatically adjusts the laptop performance and fan speed to keep the computer cool. You can set HP CoolSense software to your specifications. For more information, see HP Notebook PCs - HP CoolSense Technology. Step 5: Placing the notebook in a cooler room Step 6: Testing for hardware failure Testing for Hardware Failures (Windows 10, 8) Testing for Hardware Failures (Windows 7) Checking Your Notebook PC Using the HP System Health Scan for laptops running Windows Vista Fan Is Noisy and Spins Constantly, PC Is Warmer than Normal Tips for Using, Carrying, and Protecting Your HP Notebook PCKeeping your HP laptop cool is essential in protecting your company's files. Goodshoot/Goodshoot/Getty Images Hewlett Packard laptops are highly portable, allowing busy professionals to easily transport an entire file cabinet’s worth of data from one job site to another – but as with any laptop, this feature can prove to be its undoing.

Because their compact size hinders airflow, HP laptops are highly susceptible to overheating. If your Hewlett Packard’s fan isn’t functioning properly, it’s important to waste no time in replacing it. 1. Shut down your HP laptop, unplug its power cord and disconnect all peripherals. 2. Discharge built-up static electricity from your body by touching an unpainted metal object. 3. Place a soft cloth, such as a towel, on a flat surface. Close your laptop’s display panel and place it upside-down on the cloth. 4. Remove the screw or screws from the battery cover with a Phillips screwdriver. Depress the locking tabs and lift out the battery assembly. 5. Remove the screws from the hard drive cover with a Phillips screwdriver and lift off the cover. Unplug the cable that connects the hard drive to the motherboard, if applicable, and slide the drive out of its bay. 6. Remove the screws that secure the CMOS battery and memory module panel. Lift off the panel and remove the battery and modules.

7. Remove the keyboard cover screws with a Phillips screwdriver. These are located in some or all of the following places: the two corners of your laptop’s bottom, directly under the center of the keyboard, in the memory module bay and in the battery compartment. 8. Turn the laptop over and open the display panel. Using a flat-head screwdriver, pry off the upper section of the keyboard flange. This is the piece that’s closest to the display panel. 9. Remove the upper keyboard screws, which are located over the “F” keys. 10. Lift the keyboard just enough to reveal its ribbon cable connection to the motherboard. If the ribbon cable is secured with a locking flap, lift the flap and gently pull the cable from the motherboard socket. If the connector features locking tabs, depress and hold in the tabs as you pull the cable from the socket. Lift out the keyboard. 11. Locate the LED board socket, which is labeled, on the motherboard. Grasp the connector with your thumb and forefinger and carefully unplug the wire that connects the LED board to the motherboard.

Do the same for the video display, power button, webcam, two antenna connections and touchpad, if applicable. 12. Remove the screws from the display panel’s hinges with a Phillips screwdriver. Hold the panel with your free hand to prevent it from falling when the last screw is removed. 13. Lift off the top cover assembly and unplug the cables that connect the USB ports, power jack and audio jacks to the motherboard. 14. Remove the screws from the motherboard with a Phillips screwdriver. Use both hands to carefully lift the motherboard from the laptop case. 15. Remove the screws from your HP’s fan or cooling assembly, unplug its power connector and lift it out of the laptop case. 16. Place your new fan or cooling assembly in the laptop case, tighten its screws and plug in its power connector. 17. Reassemble your HP by following steps 4 through 16 in reverse order. Things Needed Replacement fan or cooling assembly Towel or soft cloth Phillips screwdriver Flat head screwdriver Magnifying glass (optional) Tips Warnings References Inside My Laptop: How to Take Apart HP Pavilion DV5 Laptop Photo Credits Goodshoot/Goodshoot/Getty Images Suggest an Article Correction