gateway laptop fan removal

Your Gateway laptop needs a working fan to function properly. Scott Olson/Getty Images News/Getty Images All computers rely on fans to prevent the motherboard, hard drive and other parts from overheating. If a fan is not working properly, it may become noisier as it works to maintain the machine at the optimal operating temperature. If the fan stops working altogether, the laptop may freeze, display a "blue screen of death" error or spontaneously shut down. Gateway laptop fans are connected to a heat sink that helps cool the internal components. The fan and heat sink are attached, so you must remove and replace them as a unit. 1. Turn off the laptop and disconnect all cords, including the power cord. Close the screen if it is open. 2. Turn the laptop over so the bottom is facing up. Press the locks on the battery to disengage them, and then remove the battery. 3. Remove the screws securing the fan compartment cover. You can see the fan through the vents in this portion of the bottom casing.

4. Remove the screws securing the heat sink and fan assembly to the motherboard. 5. Disconnect the white connector attached to the motherboard. 6. Gently pull the heat sink and fan out of the laptop. 7. Apply a thin coating of heat sink compound, also known as thermal paste, to the bottom of the new heat sink unit. This creates a barrier between the heat sink and the motherboard, increasing cooling effectiveness. Do not put thermal paste on the fan itself. 8. Place the new heat sink and fan in the laptop and reconnect the white connector to the motherboard. 9. Refasten the screws to secure the fan unit. 10. Put the fan compartment cover back on the laptop and secure the screws. Things Needed Phillips screwdriver New heatsink and fan unit Heat sink compound References Inside My Laptop: How to Disassemble a Gateway MX Photo Credits Scott Olson/Getty Images News/Getty Images Suggest an Article Correction Gateway MD2614u Fan Replacement This guide needs better markups. Help out by correcting or making some markup annotations.

Improve this guide by completing or revising its introduction. You will remove the back cover, remove screws from the fan and heat sink, and take out the fan from the laptop.
dryer vent cleaning services hawaii Place the laptop so the back cover is facing up.
best way to clean dirty leather car seats Remove the 8 screws from the back cover using the Phillips #00 screwdriver.
air conditioning coil cleaning cost Lift off the cover. Unplug the fan’s power cable, which is a group of black wires attached to a white plastic head on the motherboard. Pull the plastic part of the cable, not the wires, so that the plug does not break. Remove the two screws located on opposite sides of the fan with a Phillips #00 screw driver.

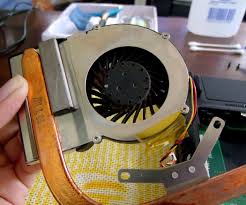
The fan is permanently attached to the silver heat sink next to the RAM. To completely remove the parts, loosen the heat sink’s four screws with a Phillips #00 screw driver. Take out the screws in the numerical order shown on the heat sink. Pull the fan and heat sink toward you at a 20 degree angle upward. To reassemble your device, follow these instructions in reverse order. One other person completed this guide. Past 24 Hours: 0 Past 7 Days: 0 Past 30 Days: 3Replacing old Gateway laptop fan, but need help Can't find your answer ? When you want to upgrade the memory, clean the fans, or replace the Wi-Fi adaptor of your Gateway laptop computer, you will need to disassemble the motherboard and base unit completely. The entire disassembly process can be performed with some basic tools and typically takes between 1 and 2 hours.Prepare the laptop for disassembly. Shut down the laptop completely, then wait a few minutes before removing the battery and unplugging the AC adapter.
Turn the laptop over and lay it down on a flat surface so that the battery area is facing away from you and the hard drive is located at the bottom left corner.Remove the hard drive cover. Remove the two screws located on the left side of the hard drive cover, then lift the cover to remove it completely from the unit.Remove the memory cover. Unscrew the eight screws holding the memory board in place; this cover is located above the Gateway product sticker.Disconnect the Wi-Fi adaptor. Remove the Wi-Fi cover by unscrewing the single screw holding the Wi-Fi adapter in place; this is located directly above the hard drive. Remove the two cables connecting the wireless card to the adapter and snap the card out of the holder.Remove the memory modules. Gateway computers typically have two memory modules located in the center of the motherboard; lift these out gently with your fingers and set them aside.Release the heat sink. Unscrew the four screws around the heat sink assembly; this unit is located to the left of the ventilation fan and is surrounded by a copper base.

Carefully lift the heat sink and the cooling fan off the unit and unplug the cable attaching it.Remove the CD/DVD drive. Unscrew the small screw located to the left of the CD/DVD drive, then push the drive out to remove it from the laptop completely.Remove all screws around the base of the laptop. You will now be left with a total of 18 screws located around the edge of the base of the laptop, and in between the stickers and hardware components in the center. Remove all of these carefully and set aside in a safe place.Prepare the cover for removal. Turn the laptop up on its edge so that the back of the laptop is facing you; you will see two screws on the hinges of the computer. Unscrew these and set them aside.Remove the hinge cover. Open the laptop so that the screen is laying flat; use the flathead screwdriver to pry open the hinge cover and pull it off gently with your fingers.Lift up the keyboard and reach behind it to release the cable. You will need to tug gently on the cable to unhook it from the motherboard.