fan on hp laptop stopped working

In this guide I explain how to disassemble an HP Pavilion dv7 notebook. This is my first disassembly guide for HP pavilion dv7 series. To be precise, I’m taking apart an HP Pavilion dv7t-1000 model. I found that HP Pavilion dv7 notebooks come in different body types. If your computer doesn’t look like one shown in this guide, check out: – dv7t-3000 disassembly guide (also works for HP dv7-2000). Before you start, turn off the computer and remove the battery. Remove (loosen) four screws securing the hard drive and memory cover. Remove four screws securing hard drives (two screws per hard drive). Slide the HDD 1 to the left until it’s disconnected from the motherboard and remove it. Slide the HDD 2 to the right until it’s disconnected from the motherboard and remove it. Remove both memory (RAM) modules. Disconnect two antenna cables from the wireless card. These laptop has three antenna cables but only two are used. One of the antenna cables connected to the main contact on the wireless card and the second one is connected to the auxiliary contact.

All three antenna cables are labeled. Remove two screws securing the wireless card. Remove one screw securing the CD/DVD drive. Slide the CD/DVD drive to the left to disconnect it from the motherboard. Remove all marked screws from the bottom case. The green circled screw secures the keyboard. Don’t forget to remove two screws hidden in the CD/DVD drive bay. Start separating the speaker cover from the top cover. You can use a guitar pick as a case cracker. Insert the guitar pick between the speaker cover and case and slowly move along the side. Lift up the speaker cover. Be careful, it’s still connected to the motherboard. In order to remove the cable, you’ll have to unlock the connector first. Move the brown clip about 2 millimeters in the direction shown by two arrows. The clip must stay attached to the connector base. On the picture below the connector is shown in the unlocked position. Now you can remove the speaker cover.

Remove four screw securing the keyboard. Lift up the keyboard from the base and access the cable connector underneath. Carefully unlock the keyboard cable connector.The brown clip must stay attached to the connector base. If you damage the connector, the keyboard will not work.I broke the connector. As you see, the left pin on the brown clip is missing. It’s still possible to use this clip to lock the connector. Pull Wi-Fi antenna cables though the opening in the cover. Remove three screws securing the speaker assembly. Disconnect the speaker cable (green arrow) from the motherboard. Disconnect the video cable from the connector on the motherboard. Remove six screws securing display hinges (three screws per hinge). Separate the display assembly from the notebook base. In the next post I will explain how to remove the screen. By the way, it’s not necessary to separate the display panel assemble from the base in order to take it apart.
Disconnect and remove the CMOS battery. Remove all marked screws from the bottom. The green circled screw is hidden in the CD/DVD drive bay. Remove all screws securing the top cover assembly. Disconnect the touch pad cable from the motherboard. Start separating the top cover assemble from the notebook base. You can use same trick with the guitar pick shown in the step 6. Remove the top cover assembly.
best wood cleaner and restorer Here’s the back side of the top cover assembly.
leather cleaning san diego Disconnect the USB and audio board cables from the motherboard (green arrows).
best leather care for king ranch
Disconnect the cooling fan cable from the motherboard (yellow arrow). Remove four screws securing the motherboard. Lift up the right side of the motherboard as it shown on the picture below and disconnect the DC-IN jack cable. Remove the motherboard from the notebook base. On the opposite side of the motherboard you can access the processor (CPU) when the heat sink is removed. By the way, the best way to find a replacement motherboard is searching by the HP part number.
vacuum cleaner ratings uprightThe part number should be located on a sticker in the memory compartment.
best vacuum cleaners for stairsThe HP part number looks like XXXXXX-001.
best upright vacuum cleaner ever
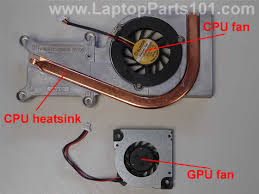
Here’s the bottom case without motherboard installed. The USB board, audio board, cooling fan and DC-IN jack are mounted on the base. The DC jack attached to a harness. In order to remove the cooling fan, simply remove two screws securing the fan. As you see, the cooling fan is dusty and has to be cleaned. There are only two fans listed in the service manual for HP Pavilion dv7 series. They are listed on the page 27. 488885-001 for notebooks equipped with AMD processor. 480481-001 for notebooks equipped with Intel processors. You can support my work! How can I control the computer's fan speed? On Windows there is a wonderful program called SpeedFan. This functionality depends on both your hardware and software. If your hardware doesn't support fan speed controls, or doesn't show them to the OS, it is very likely that you could not use this solution. If it does, but the software (aka kernel) doesn't know how to control it, you are without luck.

Install the lm-sensors and fancontrol packages. In terminal type sudo sensors-detect and answer YES to all YES/no questions. At the end of sensors-detect, a list of modules that need to be loaded will be displayed. Type "yes" to have sensors-detect insert those modules into /etc/modules, or edit /etc/modules yourself. Run sudo service module-init-tools restart. This will read the changes you made to /etc/modules in step 3, and insert the new modules into the kernel. Note: If you're running Ubuntu 13.04 or higher, this 3rd step command should be replaced by sudo service kmod start. In terminal type sudo pwmconfig . This script will stop each fan for 5 seconds to find out which fans can be controlled by which PWM handle. After script loops through all fans, you can configure which fan corresponds to which temperature. In my case I set interval to 2 seconds. Set up fancontrol service Run sudo service fancontrol start. This will also make the fancontrol service run automatically at system startup.
In my case for CPU I used: If you own a ThinkPad, there's a piece of software called thinkfan that does exactly this. As the name obviously suggests, it is specifically made for ThinkPads (thinkpad_acpi). The thinkfan software is available in the standard ubuntu software repositories, but it does require a few steps to configure. Here's an easy step-by-step guide: (which is basically a translated version of this German guide: Relevant Information from Post:Install the thinkfan software and the sensors: sudo apt-get install thinkfan lm-sensorsMake sure that the daemon controls the fan by editting the thinkpad.conf file: by adding the following line:Make the daemon load automatically at start-up by editting the file: making sure that the START key is set to yes, i.e. there should be a line that says:Detect your laptop's sensors: and just choose the default answers whenever you're prompted by hitting Enter.Load the new modules. From ubuntu 13.10 this done by:

sudo service kmod start while for previous versions like 13.04 you instead will need to do: sudo service module-init-tools startFigure out which sensors are in use: (the ones that indicate 0 degrees are not in use, I don't know why those are "detected" too). Remember which ones are in use.Find out the full paths of these sensors: find /sys/devices -type f -name "temp*_input" The output should be a list of paths like /sys/devices/...Copy-paste the paths to the sensors into the configuration file /etc/thinkpad.conf. To do this, first open up the file: There should already be a line like #sensor /proc/acpi/ibm/thermal (0, 10, 15, 2, 10, 5, 0, 3, 0, 3) (the #-symbol means that that line is commented out). Add a line starting with sensor (without the #-symbol) and copy-paste you first sensor. Repeat this if you have more than one sensor. For example, on my machine, the output in step 7 yields The ones that are in use in my machine are the ones in the first and the last two lines, so I added the three lines:

Finally we can set the fan speed levels in the configuration file. Open the /etc/thinkpad.conf file if it wasn't open already. The fan levels I use on my ThinkPad x201 are: The last line ensures full fan speed (127 = "disengaged" i.e. unregulated). You can fiddle with these levels to fit your needs/wishes, but PLEASE BE CAREFUL!Everything should work now. In order to check whether thinkpad is runnning correctly, use which starts thinkfan in verbose mode. You might want to stop the thinkfan daemon first: If you want to start the thinkfan daemon again, type: Just to be complete, my /etc/thinkfan.conf configuration file is: # To keep your HD from overheating, you have to specify a correction value for # the sensor that has the HD's temperature. You need to do this because # thinkfan uses only the highest temperature it can find in the system, and # that'll most likely never be your HD, as most HDs are already out of spec # when they reach 55 °C.
# Correction values are applied from left to right in the same order as the # temperatures are read from the file. # sensor /proc/acpi/ibm/thermal (0, 0, 10) # will add a fixed value of 10 °C the 3rd value read from that file. # /wiki/Thermal_Sensors to find out how much you may # want to add to certain temperatures. # (LEVEL, LOW, HIGH) # LEVEL is the fan level to use (0-7 with thinkpad_acpi) # LOW is the temperature at which to step down to the previous level # HIGH is the temperature at which to step up to the next level # All numbers are integers. # I use this on my T61p: # My settings for my ThinkPad X201: (kris) Install and configure the lm-sensors and fancontrol packages: sudo apt-get install lm-sensors fancontrol Documentation for configuring them is available on their man pages. This is a function that is supposed to be provided by a ACPI-compliant BIOS, but it seems that most motherboard vendors don't bother to follow the standard.