evaporator coil cleaning air conditioner
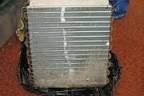
You'll need five tools to clean the evaporator coils on your AC unit: a screwdriver, a stiff brush, a large hand mirror, household bleach and wire. Once you have these tools, make sure you know where the evaporator coils are located. You'll find the evaporator for a central air system located directly above the furnace in the plenum (main duct). Your AC unit may have a plenum that is sealed shut. If so, don't try to open it; it means you don't have an AC unit you can clean yourself. Assuming you can open your AC unit's plenum, the first thing you want to do is remove the foil-wrapped insulation at the front of the plenum. This insulation is likely taped in place, so remove this tape carefully. You will have to put it all back. Behind the insulation is an access plate. Take your screwdriver and remove the screws holding the plate in place. Once the screws are out, remove the access plate. Now you should see the evaporator itself. Some can be slid out a bit, even if they have rigid pipes, but be careful as you do so.

Use the stiff brush and hand mirror to clean out the underside of the evaporator unit. You'll also want to clean out the tray that sits below the evaporator. The tray is there to carry away condensation from the evaporator. Take one tablespoon of bleach and pour into the weep hole to prevent fungus growth. If the tray has a lot of moisture, it could be due to a blockage in the drain line that connects the weep hole to the tray. If that's the case, you can open up the drain line by pushing a wire through it. Once the cleaning has been done, push the evaporator back into place if you've moved it and screw in the access plate. Then you need to re-tape the insulation back over the plenum.You are here » Maintaining Your Air ConditionerEdit ArticleHow to Clean Air Conditioner Coils Cleaning your air conditioner's condenser coils regularly will let your air conditioner run cooler with less energy and make you feel more comfortable. The best time to clean your air conditioner is in the spring, just before you anticipate using it for the first time in the year.

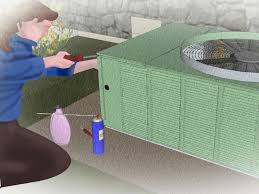
You can do this with just water, or if the dirt is considerable, a biodegradable foaming cleaner mixed with water. Spray the cleaner from the outside in and let it soak in for 10 to 15 minutes. You may wish to re-apply the cleaner and let the second application soak for another 5 minutes.
duct cleaning equipment australia Before you spray the air conditioner, cover any electric wires or motors with plastic. Rinse away the cleaner from the coils. Inspect the coil fins for any damage. Reassemble the air conditioner. You should only need to fully clean the air conditioner once a year, but if you live near cottonwood trees or dandelions, you may have to clean the unit more frequently during the spring, possibly weekly or even daily. The above instructions can also be used if you own a heat pump, as the external condenser unit is constructed similar to an air conditioner.
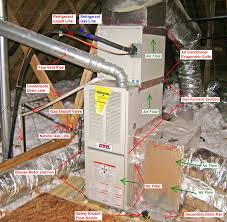
If you spot any problems during the cleaning process, such as an oil leak or damage to the refrigerant coolers, contact an air conditioner service technician.You don't have permission to access /air-conditioning/evaporator-coil-services/Keep your air-conditioner (AC) maintained and you’ll not only save money on energy, but you’ll also extend its lifespan, saving money on costly early replacement. Dave Moody, HVAC pro from Service Experts, says, “An AC needs regular attention to be sure it’s operating at the highest efficiency.” The best time to use these tips is just before each cooling season begins. Your Heating, Ventilating, and Air-Conditioning system (HVAC) will consist of either a furnace and AC or a heat pump, which both heats and cools. Both types will have an interior unit (evaporator and blower) and an exterior unit (condenser coil and compressor). These instructions apply to a whole-home air-conditioning or heat pump unit. Due to the dangers of working around electricity and the air-conditioner’s moving parts, it’s essential to completely turn off power to the unit.
On the exterior condenser/compressor, look for an exterior shut-off box near the unit. Indoors, also turn the power off at the breaker box. On the exterior condenser/compressor, remove the fan cage. Using a screwdriver or wrench, remove the fasteners and lift the cage or fan grill away from the top of the unit. By hand, or with a wet/dry vacuum, clean leaves and other debris from the interior. With a strong stream from a garden hose, spray through the fins from the inside out to blast any built up dirt or debris from between them. Never use a pressure washer, since the pressure can damage the fins. If the fins are particularly dirty, use a commercially available fin cleaning spray (available at home improvement centers; read and follow manufacturer directions). Since any reduction in air-flow through the fins can reduce efficiency, carefully straighten bent fins using a butter knife or commercially available fin-straightening tool. Be gentle so that the tubing embedded within the fins is not damaged.

Once finished with the cleaning, replace the fan cage. Rake back leaves and debris outside the condenser and cut back branches and vegetation at least 2 feet in all directions to ensure proper airflow around the unit. During winter months when the condenser is not in use, it’s good to cover the top of the unit with a piece of plywood or plastic to keep debris from falling in. However, don’t completely cover the unit’s sides, since moisture can build up inside and cause corrosion. Also, a completely covered unit encourages vermin to build nests inside. Remove any cover when the unit is operating. Over time, the pad upon which the condenser unit sits can begin to tip as the soil settles beneath it. An out-of-level condenser unit can cause the compressor within to fail early. Check the condenser for level and use rot-resistant shims to bring it back to level. Service Experts’ Moody adds this exception: “If you have a heat pump system, it’s okay for the pad to be slightly sloped away from the home’s foundation to allow for defrost run-off during the winter.”

Now it’s time to move inside. On the inside blower/furnace unit, find the evaporator coil door. You may need to remove some foil duct tape and take out a few screws or bolts. Inside, use a soft brush to dust off the coil, then spray the coil with commercially available no-rinse coil cleaner (available at home improvement stores). The spray will foam up and then drip into the drain pan. Clean out the drain pan with soap, hot water, and a little bleach. Then, pour a cup of 50% bleach/50% water down the drain. To keep the drain clear longer-term, place a commercially available drain pan tablet in the pan. This will inhibit future algae growth. If the bleach solution drains easily, skip the next step. If not, move on to next step. Replace the evaporator coil door and use foil duct tape to re-seal, if necessary. On the interior, warm, humid air from your home’s interior is blown through the evaporator coil. The cold coil absorbs heat from the air, cooling it, before the air is circulated back into your home.
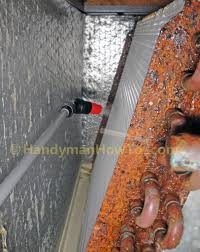
The humidity in the air condenses on the cool surface of the evaporator coil as liquid water, dripping into a pan below. From the pan, the water flows into a drain tube which is typically routed into a basement floor drain, utility sink, or outdoors. Over time, algae and mold can build up and potentially plug the drain, so if the drain is either not flowing or flowing very slowly, it will need to be unplugged. A plugged drain can either cause damage by flooding onto the floor or, if the system is equipped with a drain float, cause the system to stop cooling in order to avoid flooding. First, find the drain line where it leaves the evaporator coil enclosure. The drain is usually a one-inch PVC pipe (white, grey, or black). Follow it to the end where it drains. Often the line drains outside near the condenser unit, but it can also drain into a utility sink or basement floor drain or, in the case of attic units, down an outside wall. Once located, use a wet/dry vacuum to clear the drain.

It’s best to remove the paper filter from the wet/dry vacuum so as not to ruin the filter. Hold the hose of the wet/dry vacuum to the end of the drain line. You can use duct tape or simply hold a rag around the gap. Turn on the vacuum for 2-3 minutes then turn off. This will clear the drain of any growing biological matter. The filter in your HVAC system should be changed at least twice a year – once just before the heating season begins and once before the cooling season begins. If you live in a particularly dusty area, you may want to change it more often. Always replace the filter with a new filter that has the same airflow rating. Again, Moody cautions, “Be careful with ‘air purifying’ or HEPA filters,” he says, “because they can dramatically reduce airflow in your system. That can cause the indoor coil to freeze because of the reduced airflow.” Locate the filter enclosure on the indoor furnace/AC where the large fresh air return duct enters the unit. You may need a screwdriver to turn the latch to open the door to the filter enclosure.