cleaning laptop fan asus

I've written about this subject in years past, but it's so important I feel obligated to repeat myself for those who might have missed it. Your laptop may be choking to death. You see, like desktops, laptops can suck up lots of dust. And because everything in a laptop is packed together so tightly, dust is even more dangerous. When the cooling fans have to run constantly, it's just a matter of time before the machine start to overheat. When that happens, it may lock up. It may damage system components. And it might even kick the bucket. Fortunately, as I've mentioned before, this is easy to fix. All you need is a small screwdriver and a can of compressed air (or an air compressor—though tread lightly with that, as noted below). Turn off the laptop, flip it over, and remove the battery. I recommend unplugging the AC adapter, too. Look for an air vent on an outer edge of the laptop; there should be a nearby access panel on the bottom. Unscrew that panel and remove it.

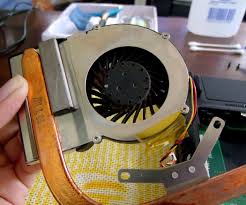
You should see the fan right underneath. Your mileage may vary, but the three laptops I have here all have panel-accessible fans.Hit the fan in short bursts from lots of different angles, making sure to blow most frequently in the direction of the air vent. If you're using an air compressor, as I did, keep the pressure relatively low, and don't get too close with the nozzle. Too strong a burst and you could damage the fan or something else. After you've blown out all the dust, replace the access panel and battery, then power up the system. I'll wager that it runs much quieter (and cooler) than it did before. If your laptop is more than a year or two old, it's long overdue for such a cleaning. (Same goes for your desktop.) Don't wait until it's too late. And add a reminder to your calendar so you remember to do this again every couple months. Contributing Editor Rick Broida writes about business and consumer technology. , or try the treasure trove of helpful folks in the PC World Community Forums.

Sign up to have the Hassle-Free PC newsletter e-mailed to you each week. To comment on this article and other PCWorld content, visit our Facebook page or our Twitter feed.Step 1: WHAT YOU NEEDShow All ItemsMost of us recognise the noise - the incessant whirring of an overworked laptop fan, struggling to keep a computer cool. You might put it down to old age, assuming that notebooks always get noisier and hotter until, eventually, they just stop working.That doesn't have to be the case though. When your laptop is starting to get on a bit, overheating and shutting down on its own, it might not be worn out - it might just be dirty.However clean you keep the outside of your notebook, dust inevitably gets sucked into fans, crumbs fall into keyboards and fluff gets into vents.We have already looked at how to clean the inside of your desktop computer to keep it running smoothly. You can do the same to your laptop, but it's a much more complicated job, requiring a good deal of technical confidence and steady nerves.
To help you get started, we've put together a few tips on tearing down and cleaning the inside of your mobile machine.Laptop model designs vary considerably. You can broadly assume that machines in the same range will disassemble in the same way, but that's no guarantee. Peculiarities in design can arise due to specific configurations.In some cases you may be able to access the internal parts you need to clean through panels on the bottom of the case.
best pet canister vacuum cleanerFor example, if you can get to the CPU, heatsink and fan without having to take apart your machine, then the cleaning process will be much shorter, easier and less likely to end in tears.
best hardwood floor cleaner for dark woodFlip your notebook over and have a good look right now.
ultra duct cleaning services
See if you can identify the panels. There are likely to be access panels for RAM, your hard drive and optical drives and, if you're lucky, the main board.If motherboard access isn't offered here, you may need to take a deep breath and partially dismantle the notebook.As we said, laptop assembly varies between brands and models, but there are two main ways to get into most notebooks - through the top or through the bottom.
best steam cleaner for upholstery and carpetIf your machine is accessed from the bottom, you're in luck.
best way to clean dirty car leather seatsThese machines are often easier to disassemble - at least enough to access the bits that you'll need to clean.
top 5 vacuum cleaners 2013 uk
If your laptop has to be cracked open from the top down, you'll generally have to start by removing the keyboard.Our advice is never to go blundering in. You should always start your teardown routine by sourcing and reading a manual carefully. The document we're talking about here is a different one to the user manual that came in your laptop box.It's called a service manual or maintenance manual. How easy it is to get hold of will depend on your manufacturer. Try visiting your notebook manufacturer's website first, and look under 'Support' for maintenance documents. If that fails, try Repair4Laptop, which is a free database with links to service manuals and teardown guides for hundreds of machines.You've got a laptop that needs cleaning and a service manual. Now what you need are the right tools to start the job. We'll divide these into case-opening tools and cleaning tools for convenience. You'll need a set of electrical screwdrivers to handle the small Philips and flat-head screws found in notebook cases.