clean laptop fan hp
By Tim Trott, Monday 28th July 2008 in Hardware Share on Facebook Tweet Share on Google+ Share via LinkedInHP Laptop repair and a guide on how to dismantle an HP laptop to clean or repair internal components such as the cooling fan, hard drive, memory or screen.My laptop is getting on a bit now and has started developing a few problems. Primarily I am experiencing overheating, with the fans running at full power and various a few other niggles. This is my illustrated guide for HP laptop disassembly. It is based on the ze5400ea model but should be similar for any HP pavilion disassembly. I am approaching this with four main objectives:This procedure will certainly invalidate any warranty you may have on your product. This guide is produced through experimentation and is in no way endorsed by HP or Compaq. Always follow correct electrical safety procedures. Do not undertake this task if you are uncertain about dismantling/repairing electrical components. The author, Tim Trott, accepts no responsibility or liability for any damage to hardware, loss of data, injury or anything else.

Whilst every effort is made to document as accurately as possible, this is a guideline only and any work you decide to carry out, you do yourself. Basically if you mess up its your fault.I am experiencing ever increasing fan noise, due to the processor overheating. A quick inspection through the fan grille shows substantial dust build up and I assume that this is restricting the air flow and the thermal efficiency of the cooling mechanism.I am also experiencing a poor wireless performance, while one minute it will be connected perfectly fine then, without warning, the bandwidth will drop to 1mbs (still with good quality and strength) and will not communicate with anything. When I disable the connection and re- enable a few networks are discovered, but not mine. I have to keep dis/re-enabling the connection and eventually it will pick up the signal again. This could remain stable for the rest of the day, or 5 minutes. As a temporary fix I am using a PCMCIA wireless card which has functioned perfectly fine.

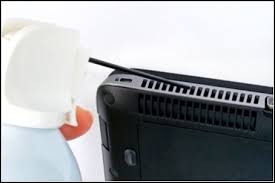
The power switch is very detrimental about when it works, mostly not working. I have to use the quick function buttons to activate the laptop. Feels like the switch is Pepsified (that's covered in Pepsi).Finally, the floppy disk no longer accepts floppy disks. They go in part way but do not 'clunk' down to the heads and spindle, rendering it useless.The first thing we need to do is remove the Battery and AC connector to prevent any electric shocks. Next is to remove the Hard Drive and store it safely to prevent risk of data loss. The hard drive can be removed by unscrewing three screws on the underside of the laptop. One screw is covered by a rubber grommet.Next remove all the screws from the underside and rear of the laptop. There are no screws under the memory and expansion panels and there are no labels covering any screws.Having removed the heat sink it was obvious that the metal fins were totally clogged up with dust. Taking it outside and blowing compressed air into the fins and fans removed most of the dust, and a paintbrush helped with the rest.

The difference is obvious between before and after. Hopefully this will help with the overheating issue. When reassembling the heat sink to the main board I cleaned both surfaces with isopropanol and I used a little Artic Silver to aid with thermal transfer.
best vacuum cleaner for stairs 2013Please also observe the correct sequence if you decide to do this.
best way to clean vinyl awningsMindi has kindly written in advising me that HP offer a BIOS update that will reduce fan noise.
best car vacuum cleaner malaysiaSince my fans are still noisy (although much less now) I had a look into this link. The BIOS version to fix fan noise is version KH.F.15, and since my BIOS is KH.F.08 I thought it wouldn't hurt to give it a go.

I don't usually update BIOS software (if it isn't broke, don't fix it), but if this can help reduce fan noise I had to check test it out.This BIOS update was tested on my ze5440ea model, the update process was absolutely perfect and as easy as downloading the file (1.6mb) and running it. I would make sure that you check compatibility from the HP website before running the update, and it looks as though the flash updater itself check compatibility before starting.Once downloaded, simply run the executable and it will self extract and launch the flash program. From there it's just a case of following the onscreen steps. If successful the system will reboot and you should have an Intel logo as well as the HP logo as it boots up.First impressions are that the fans are less noisy, I have determined that there are 4 fan speeds in use: 1) Off (only if using outside or in very cold rooms (AC). 2) Quite running (seldom heard) 3) Normal Noisy running and 4) Going into meltdown.It seems that in this update HP have changed the normal running mode to quiet running by changing the temperature threshold.

The BIOS flash works! Thanks for sharing this tip with us Mindi.My first task was to clear the fans and heat sinks from dust to reduce the noise from the fans running at full speed constantly. This was achieved by removing the heat sink assembly from the processor and blowing compressed air into it, further, a paintbrush was used to remove stubborn particles.This has had the desired effect, with the noise greatly reduced. This should also improve the performance of the laptop slightly as well as lengthen the lifespan.I could find no cause for the poor wireless performance, all cables intact and all contacts clean, however the card and contacts were cleaned with alcohol and reseated and it does seem to be performing a little better. Update on next day: Back to usual - non working. No idea why this laptop can't connect to wireless lans one minute and not the next.The faulty power switch I have put down to a bad design flaw. The switch is illuminated by an led from below. When pressed, the switch rock on a pivot point to depress a micro switch to the left of the button, therefore the button must be depressed not in the centre, but off to the right, in order that the micro switch be activated.