clean a hp laptop fan
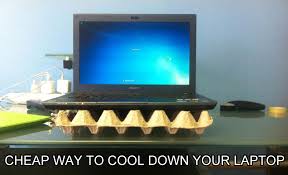
Creative, Hack, Laptops, Picdump Simple Laptop Cooler and 21 More Cleaning Life Hacks That Will Come in Handy Laptop coolers will normally run upwards of $15, or at least for a decent one that won't break down after a simple tumble, and comes complete with 160mm fans that can spin at approximately 1500RPM. However, for those who want an even more economical solution, your local grocery store just might be the best bet. That's right, just pick up a two dozen carton of eggs and just prop the computer up on the cardboard afterwards. If you need even more height, simply fasten the two halves together with super glue. Continue reading to see 21 more cleaning life hacks that will come in handy. Click here to view the first image in today's viral picture gallery. 5. Cleaning and Grinding 4. Freshening Up the Couch 1. Dryer Sheets for All Lenovo Thinkpad Yoga 11E Windows 10 Laptop Doubles as a Tablet, Get One for Under $270 Shipped - Today Only Razer Project Valerie is a Laptop with 3 Displays, NVIDIA GeForce GTX 1080 Graphics

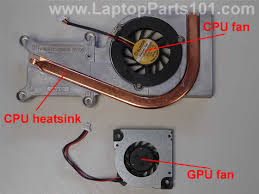
Acer Predator 21 X Gaming Laptop Will Cost $8999, Has 21-inch Curved Display MacBook Air-Inspired ASUS Zenbook UX330UA 13.3" Ultrabook Has Core i5 CPU and 256GB SSD, Get One for $679 Shipped - Today Only Eve V is World's First Crowd Developed Computer, Surpasses $1.1-Milllion in Funding Interesting Posts Around the WebA CPU cooling fan is a dedicated fan which cools down the heatsink and eventually the CPU (Processor). Usually the CPU cooling fan comes as a part of the heatsink assembly – a metal part drawing heat from the CPU chip. In addition to the CPU cooling fan, some laptops have a dedicated GPU (graphics processing unit) fan which cools down the GPU chip. The CPU and GPU cooling fans connect directly to the motherboard via a cable running from the fan. When CPU and GPU chips get hotter, the cooling fan spins faster. On some laptops the cooling fan can be easily accessed through a door on the bottom, as on the following Gateway laptop. If you cannot find it on the bottom, then it’s buried inside the case, as on the following Dell laptop.
If your laptop feels very hot and shuts down without any warning, it’s possible that you have a faulty fan. Listen for the fan. Sometimes you can see the fan through the fan grill on the bottom of the laptop. Can you see the fan spinning? If the fan never starts, probably it is bad and has to be replaced. When the fan bearing goes bad, the fan starts making grinding noise. In this case you’ll have to replace the fan. If your CPU fan works hard all the time, most likely it happens because the heatsink is dirty and is clogged with dust and lint. You can clean the heatsink using compressed air.Not all laptops are designed equal Over time it is common for fans in laptops to become clogged with dust, fluff and even hair. The symptoms are usually a hotter laptop and a noisier fan that runs more frequently. The solution is to open up the laptop’s body in order to get at the fan and remove the crud with tweezers and by blowing. However, dismantling many laptops to access the fan makes the Mission Impossible break-in look simple, and this seems to be getting worse as laptop prices continue to decrease.

If you are not confident you can unblock the fan yourself, you’ll have to find a local computer repair shop and you may find it’s not cheap. For some models the dismantling procedure can be so complicated that people post videos on YouTube. Often it is necessary to remove numerous screws, ribbon cables, jumper leads, plastic strips and the keyboard. In some cases you have to disassemble the laptop almost entirely. Fortunately, in the case of RAM modules there is often a hatch in the laptop’s base to facilitate access, but even adding or replacing RAM modules can sometimes be a major task (I used to own an Acer laptop that required the laptop base and keyboard to be removed in order to access the RAM modules).
sofa cleaning dallas tx Not long ago I had the misfortune to have to dismantle an Acer Aspire 5536-643G25Mn and a Toshiba Satellite C660-1J2 to remove accumulated fluff from the fans.
best cordless stick vacuum cleaner 2013
I had to study YouTube videos carefully and could not believe how difficult it was to get access to the fan in the Acer Aspire. Dismantling the Toshiba Satellite to access the fan was not quite as bad as the Acer Aspire but was still a major task and, despite being as careful as possible, I still managed to break a fragile plastic lug on one of the base panels. Last week my main laptop, a Compal NBLB2, seemed to be running a little hotter than usual, so I decided it was time to check if its fan also needed cleaning.
best air duct cleaning in dallasWhat a pleasure that was in comparison to the other manufacturers’ laptops.
best way to clean dust from wooden blindsThe NBLB2 has a large plate in the base that, by removing only three screws (see the first photograph below), allows easy access to the fan and RAM modules.
air duct cleaning michigan reviews
In less than five minutes I was able to remove a wad of fluff from the fan, replace the plate and power up the laptop again. Hats off to Compal for thinking about maintenance when designing this laptop. I only wish other laptop manufacturers did the same. So, next time you need to buy a new laptop, do some research on how easy it will be to access the fan in case it needs to be cleaned. Look at the laptop’s base and check on the Web for a service manual, a YouTube video of it being disassembled, and comments in laptop/notebook forums.
cost of air conditioner coil cleaningAt least then you’ll know whether you stand a chance of avoiding paying a repair shop just to remove crud that inevitably builds up over time in the fan.If you’re like me, you’ve probably spilled something on your laptop at some point during your computing experience. For me, it happened just last week with a tall latte all over the keyboard and display, dripping down in the cracks and crevasses of my laptop.

As soon as it happened, I figured it would be a big financial loss for me as the laptop was toast, but I called a few friends and used a series of simple procedures and my laptop works like new. Standard disclaimer: These procedures may violate your warranty or possibly cause other laptop issues – follow at your own peril. If this happens to you, here’s what to do: 1. Unplug your laptop and remove the battery immediately. You need to eliminate all power sources to the laptop as quickly as possible or you’re begging for fried components. Don’t even mess with a proper shutdown; save any documents you absolutely must save, then power it down immediately and remove the power cord and battery from your laptop. As liquid goes through your laptop, every second that power continues to flow through it is another second of increased risk for your laptop. 2. Don’t put the battery back on! I’m including this step here because it is important. No matter what, don’t even consider reattaching power to your laptop for a bare minimum of twenty four hours.

If you do, you’re risking any chance of repair to your laptop. 3. Remove any detachable components. One by one, remove everything that you can remove from your laptop. Remove all cards from the card slots, all drives from the drive slots, the keyboard, the memory, and so forth. This is a great time to dig out that dusty manual, as it’ll provide diagrams for removal of most of the components. As you remove each component, you’ll want to make sure they are clean; if there’s any sign of wetness at all, perform steps four and five (below) on those components. 4. Rinse your laptop (except the screen) with distilled water. Regular tap water often has minerals in it that can create deposits and bad connections on the electronic components on your laptop. Get a gallon or two of distilled water at your local grocery store and carefully rinse your laptop and any components that may need it. Do this as soon as possible, before any liquids begin to dry inside your machine. Don’t worry about it getting wet again;

the goal here is to minimize the amount of non-water materials inside of your laptop. I recommend repeating this on every component two or three times. 5. Clean your keyboard with extreme care. This step is often very difficult and time-consuming, but it needs to be done. If your manual does not contain an exact diagram of your keyboard’s key placements, take a picture of your keyboard before you begin. You’ll probably want to use an isopropyl alcohol mix for this step to ensure the parts are as clean as possible; the isopropyl alcohol that you get at the pharmacy is often too potent for this, so I recommend a 50-50 solution of isopropyl alcohol and distilled water. What you’ll need to do is remove each key individually from its fitting, clean it and its fitting carefully with the alcohol mix, and then let each piece dry before reinserting it. Without a picture to go by, this can be a very difficult task. If your laptop has a membrane, clean it similarly. 6. Hand-dry your laptop of any sitting liquid.

At this point, if any sitting liquid remains on your laptop or any component, hand-dry it gently with a paper towel to eliminate this liquid. You want to eliminate all surface liquid at this point (it should mostly be water) so that you can get into the narrower places during the next step. 7. Clean your entire laptop carefully with rubbing alcohol and a Q-Tip. At this point, the only “bad” liquid remaining in your computer should be in the small places: in your motherboard and so forth. The best way to get rid of a lot of this liquid is to clean everything with an isopropyl alcohol solution and a Q-Tip. Go carefully over the pieces of your computer that came in contact with the liquid with the alcohol solution, using a Q-Tip to make sure parts are as clean as possible. I am frighteningly meticulous about steps like this, but I would at least recommend going over everything twice with this method. 8. Carefully clean your screen. Remember that bottle of isopropyl alcohol from step five?

You’re going to make another 50-50 mixture of that with water. Use a very, very soft cloth (I like to use flannel) and clean the screen gently with this mixture; I would recommend doing this twice. When you’re done, dry it off as best you can with the cloth. You can also use this procedure for any external part of the laptop that you want clean, but you need to be very gentle with the screen when doing this. 9. Let your laptop sit and dry for a minimum of 24 hours. I left my laptop out on a table on top of a layer of paper towels, directed a fan on it, and let everything sit for 48 hours before I even thought about reattaching everything and turning on the power. I would recommend a bare minimum of 24 hours. Don’t be tempted to “hurry” this along by using heat; you’ll possibly cause additional damage to your components. If these steps do not work, it is likely that your accident caused some direct component damage to your laptop and it will have to be replaced. However, I have had great success with this procedure (and have heard many success stories from others), which has saved me thousands of dollars.