change fan toshiba laptop
CPU underclocking helps preserve the hardware. Comstock/Stockbyte/Getty Images On the Toshiba Satellite, as with other laptops, the CPU fan cools the central processing unit. If the CPU overheats, the laptop shuts down. You can edit the CPU fan speed in the Windows 8 power options if you need to increase the fan speed to ensure that the CPU stays cool. Changing the fan speed is a simple and straightforward task. 1. Click or tap the “Battery” icon on the Windows 8 taskbar; then click or tap the “More Power Options” link in the Battery Power window. 2. Click or tap the “Show Additional Plans” drop-down arrow and select the “High Performance” option. 3. Click or tap the “Change Advanced Power Settings” link on the High Performance page. The "Power Options Advanced Settings" dialog box opens. 4. Click or tap the “+” in front of the “Processor Power Management” option to expand the list. 5. Click or tap the “+” in front of the “System Cooling Policy” option to expand the list.
6. Click or tap the “Plugged In” option, and then click or tap the “Active” option in the left navigation pane. 7. Click or tap the “On Battery” option, and then click or tap the “Active” option in the left navigation pane. 8. Click or tap “Apply,” and then click or tap “OK.” The System Cooling options are now set to enable the CPU fan while the computer is both on battery and plugged in to a power source. References The Windows Club: Configure Power Plan in Windows 8 Photo Credits Comstock/Stockbyte/Getty Images Suggest an Article CorrectionToshiba Satellite A215 S4697 Fan Replacement Be an action hero! This guide needs images that better demonstrate how to perform specific actions. A few more images would make this guide's procedures crystal clear. This guide needs better markups. Help out by correcting or making some markup annotations. This guide has been the hard work of our awesome students and is found to be exceptionally cool by the iFixit staff.

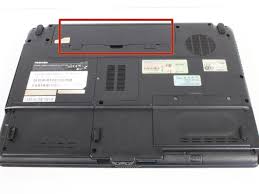
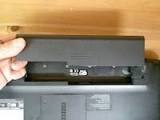
When your computer heats up and runs loudly, it may need some new fans to keep the runnin' machine cool.This guide will teach you how to get to the fans inside your laptop and replace them. Just make sure to keep track of your screws! Close the laptop and turn it over so that the base is facing upwards and the spine is facing away from you. Find the battery compartment. Slide the left slider which is just beneath the battery compartment into its leftmost position. Slide and hold the right slider into its rightmost position. Lift the battery out of the compartment. Do not touch the gold nodes inside the compartment. Place laptop right side up on a flat and clean surface. Find the strip just above the keyboard and locate the gaps behind the F1, F8, and Insert keys. Remove the strip by sticking your plastic opening tool into these gaps in order, and pulling up. Locate the two 2.3mm Phillips #1 screws at the top of the keyboard that attaches the keyboard to the frame behind it.
Look for the black tabs on both sides of cable at the laptop end of the cable.
best wet and dry vacuum cleaner reviews Using a pair of tweezers, pull the black tabs on both sides of the cable connector towards the screen until the cable can be pulled out easily. Pull out the cable and completely remove the keyboard. Turn computer over so that the battery compartment is facing up and is at the top. Locate and unscrew one captive Phillips #1 screw located at the center. A captive screw cannot be completely removed from the device's component. Use a plastic opening tool to open the motherboard access cover. Do not touch the motherboard. Remove one 1.5mm Phillips #1 screw located near the top left edge of the opening. Flip your device right side up, and rotate it so that the optical drive is facing you. Insert a paper clip into a manual release switch located to the right of the automatic release button.
Optical Drive will not release if you insert the clip diagonally. Make sure to insert the clip straight into the switch. Gently pull out the disk drive until you can see the metallic case of the optical drive. Hold the metal case and continue to pull the drive out toward you. Once you see the yellow labels on the disk drive, fully retract the disk mount until you hear a click. Continue to pull the disk drive toward you until it is completely removed from the laptop's housing. Close the lid and flip the laptop over so that the bottom side is facing you. Remove nineteen 8mm Phillips #1 screws, labeled with "F8." Locate and Remove two "f4" screws as well. Locate the RAM compartment. Unscrew the two Phillips #1 screws and lift the lid up. Note that these two screws do not detach from lid. Unscrew the two 8mm Phillips #1 screws inside the RAM compartment. Remove the three 3mm Phillips #1 screws inside the battery compartment. Turn computer over and open lid.

Make sure all the screws are cleared off the device before you flip the device over. Remove the four 8mm Phillips #1 screws in the slot where the keyboard sat. Locate the speaker cables near the top right corner. Use tweezers to carefully disconnect the cable. Locate the cable on the bottom left hand corner of keyboard slot. Gently pull it out to the left. Locate the cable at the top of the frame. Using tweezers, pull tabs on either side, toward the screen, and pull the cable out of socket. Locate another ribbon cable at the lower center of the keyboard slot. Using tweezers, pull tabs out to the left, and pull cable out of socket. Using a plastic opening tool, insert into slit around laptop and separate the silver frame from black bottom. The black lip on the front of the laptop is part of the top silver frame. Lift frame away from laptop. Locate the fan in the top left hand corner of the inside of the laptop. Remove the following screws from the fan encasement: