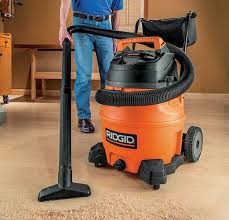
best vacuum cleaner for construction dust

Finding a high-quality vacuum, sizing it right for the amount of dust you need to capture and using it correctly (namely avoiding filter clogging) will keep harmful dust out of the air on your jobsite. “One thing contractors might not realize is by the time you start to see dust in the air because your vacuum is no longer capturing it, it’s too late. You’ve been breathing deadly dust,” says Chris McCutchen of CDCLarue Industries, Inc. “The human eye doesn’t see dust particles until they are 40-50 micros in size; silica dust is three microns and above.” There is no concrete industry standard for choosing a vacuum to handle concrete dust. One guideline contractors might look to when choosing a vacuum system is the EPA’s Lead Renovation, Repair and Paining rule. “[Lead RRP compliance] is a way to differentiate a shop vac from a dust extractor,” says Jeff Beck with DeWalt. “It’s seen in the industry as a benchmark." The EPA RRP defines a vacuum this way: "HEPA vacuum means a vacuum cleaner which has been designed with a high-efficiency particulate air (HEPA) filter as the last filtration stage.

A HEPA filter is a filter that is capable of capturing particles of 0.3 microns with 99.97% efficiency. The vacuum cleaner must be designed so that all the air drawn into the machine is expelled through the HEPA filter with none of the air leaking past it.” Other guidelines to following when choosing a vacuum for concrete dust containment include:Size. The size of your vacuum will depend on the type of equipment you will use with it – walk-behind concrete grinder, hammer drill, angle grinder, etc. Look for lift and CFM that fits the job and equipment.Double filtration is important. A HEPA filter as the last stage of filtration will be at least 99.97 efficient at removing fine dust particles from the air. Your vacuum also should have earlier stages of filtration, which will help extend the life of the more expensive HEPA filter.In its document “Controlling Silica Exposures in Construction,” OSHA recommends a vacuum with a back-pulse filter cleaning cycle. It states, “Such auto-cleaning mechanisms will reduce the time required for vacuum maintenance and improve the overall efficiency of the dust collection system.
No bugs, but there is dirt/dust. There is always dust no matter what type of home renovation you rip into. Of all of the remodeling I’ve lived through, the kitchen remodel was by far the easiest. The dishes were stored in every nook and cranny we could find. We had to cook using only the microwave. We got water from the bathroom sinks, and did dishes in the bathtub.
vacuum cleaner price in kenyaStill it was better than any other project.
replace fan asus laptop(I’m so glad you asked) Because there we didn’t have to get rid of drywall dust during this project! Drywall dust is insidious. It creeps into every room. It lingers for months after the project. No matter how vigilant you are, there will be clean up, and then more clean up. Getting rid of drywall dust is a nightmare, but there is a method to making it go easier.

There are some steps you can take before you start your project that will help you get rid of drywall dust. Turn off your central heat and air circulation. This will help cut down on dust getting caught up in the whole-house system. If it’s possible, put a fan in a window of the space you are working on, making sure the fan blows out of the room. Also, remove the window screen to allow for a free flow of air and dust. This will also help suck some of the dust outside. Remove as much furniture as is possible, especially upholstered furniture. You don’t want to be getting rid of drywall dust on upholstered furniture. What you can’t remove, you will want to cover with plastic, like a lightweight painter’s plastic. Secure the plastic with tape or bungee cords. Drywall dust has a way of getting up into places you thought it wouldn’t be able to reach. Another option is to cover the furniture with the self-sticking plastic wrap that movers use to protect furniture from damage.

Block off all openings to the rest of the house by hanging a bit of heavy-duty plastic from floor to ceiling. If you have carpet and do not plan on removing it at the end of the remodel, consider covering it with the self-adhesive plastic film which should cut down on the fine dust from becoming embedded in fibers of the carpet for months to come. Finally, cover all ductwork and vents with plastic, and tape them closed. Get out the cleaning supplies as soon as possible. This dust has a tendency to hang around and get into every little nook and cranny. It is best to get it cleaned up quickly before it has a chance to spread to other parts of the house. The sooner it’s cleaned up the less chance it has to clog important things. Getting rid of drywall dust takes perseverance. Clean frequently throughout the project. At the very least, clean daily. Don’t wait until all of the sanding is done. This might seem like a waste of time, but leaving dust lying around for days just increases the potential for the dust to circulate to other parts of the house.
Safety first: Put on a dust mask. Trust me, you will need it. The fine dust can easily get into your nose and eyes and can do a lot of damage to your lungs. This dust is especially hard on people with asthma. You might even consider safety goggles if you need to get rid of a lot of drywall dust. It is not worth leaving it to chance.Don’t use your house vacuum to clean up this dust. The fine dust particles can clog a house vacuum and ruin it.Use careful strokes with the broom to sweep from the exterior of the room into the center of the room. Be gentle as you sweep so you don’t stir up the dust. No quick, whisking movements. Scoop the pile into a dust pan and dump into a trash bag. If there is a lot of dust, consider using a sweeping compound which is specially designed to hold dust down to the floor while you sweep. Follow the directions carefully. Some products need 24 hours to settle before you can sweep. Pay attention to any cautions about using this product in conjunction to which type of flooring you plan to use.

The sweeping compound can have oils in it that can interfere with some floor adhesives. Next, use a wet/dry vac (Shopvac) with a good filter. (note: from this point forward, all references about vacuuming refer to a wet/dry vac). It is worth investing in the vacuum bags that are specially made for collecting drywall dust in the canister. These bags are specially made to keep the dust inside the vacuum. Use a HEPA filter to collect the fine particles. Also, have a back-up filter on hand in case your filter gets too clogged. The best bet is to use a filter that can be rinsed and reused. The pros recommend having two filters so you can rinse one and let it dry while using the back-up. If you aren’t sure about getting a shop vac because they’re huge, Stanley has this portable series for sale on Amazon. It’s time to put on some rubber gloves. Grab a bucket of cool water and a clean sponge or microfiber cloth (you can get Zwipes cleaning cloths from Amazon). Get the cloth damp, but ring it out good.