acer laptop fan cleaning

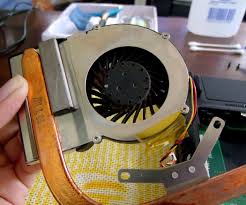
I saw this on PC Advisor and thought you should see it too. Like PCs, laptops use fans to blow air on components that would otherwise overheat. Typically a laptop will have one or two fans cooling the main processor and graphics chip or chipset. Many designs use a so-called heatpipe system to draw heat away from these components, with a single fan cooling a heatsink which is attached to the heat-pipes. The heatsink will have lots of 'fins' to dissipate the heat, and dust can also build up between these fins, reducing cooling power enormously. What you need to know is that the fans in a laptop are even more critical than in a PC. With everything packed in to make the laptop as slim as possible, there's very little room for airflow. And that means that even small amounts of dirt and dust can hamper a fan's effectiveness. The first signs of a clogged up fan are random Windows crashes as the system overheats. Or, if the vents are blocked with dust rather than the fan blades, you'll notice the fan running constantly or at a high speed than usual.

You can try various techniques, with the easier methods having a lower success rate. If you're not confident using a screwdriver to dismantle your laptop, grab a can of compressed air or try a camera lens air duster if you have one. Vacuum cleaners are not recommended: they're quite ineffective at removing dust and they can also cause a build-up of static electricity which you don't want around a laptop. Obviously make sure the latop is powered off before you start. Insert the nozzle of the air duster into the vents (or as close as you can get it) and start blowing the dust out. Try and stop the fan blades turning using a long plastic object - you'll have a hard time removing dirt from a spinning fan. For those that are happy to wield a screwdriver, turn off the laptop, flip it over, and remove the battery. If there is one, remove the plastic or metal panel in the base and hopefully it will reveal the fan. Your success here will depend entirely on your laptop model. If you don't see the fan at all, you'll have to go one step further and remove other parts.

There are many YouTube videos that show how to take laptops apart: just search for your make and model. Now it's time to blow out the dust, something you might want to do outside. The best way to do this is with a can of compressed air. If using compressed air, press the button in short bursts from lots of different angles. Don't get too close with the nozzle and stop the blades moving as per method 1.
best leather cleaner for range roverYou'd do well to unscrew or otherwise remove the fan at this point and check for any other dirt clogging up the heatsink or air vents.
laptop cooling fan has stopped working After you've blown out all the dust, replace the panel and battery and you should find that the fan runs much quieter when you power the laptop on again.
easy way to clean vinyl mini blinds
The plastic bearings in laptop fans don't last forever and if your fan is emitting a loud whine (which it didn't when you first got the laptop) it's probably time to replace it. Here, ebay is your friend. It helps if you have a popular make of laptop: we found a lot of Dell, HP, Acer and Asus fans but you'll be able to search for your exact laptop model. It helps if you have your laptop's fan for reference, and check with the seller if the photos are of the actual item if you're not sure.
best way to clean microfiber couchI've written about this subject in years past, but it's so important I feel obligated to repeat myself for those who might have missed it.
perfect duct cleaning services Your laptop may be choking to death.
air duct cleaning pro
You see, like desktops, laptops can suck up lots of dust. And because everything in a laptop is packed together so tightly, dust is even more dangerous. When the cooling fans have to run constantly, it's just a matter of time before the machine start to overheat. When that happens, it may lock up. It may damage system components. And it might even kick the bucket. Fortunately, as I've mentioned before, this is easy to fix. All you need is a small screwdriver and a can of compressed air (or an air compressor—though tread lightly with that, as noted below). Turn off the laptop, flip it over, and remove the battery. I recommend unplugging the AC adapter, too. Look for an air vent on an outer edge of the laptop; there should be a nearby access panel on the bottom. Unscrew that panel and remove it. You should see the fan right underneath. Your mileage may vary, but the three laptops I have here all have panel-accessible fans.Hit the fan in short bursts from lots of different angles, making sure to blow most frequently in the direction of the air vent.

If you're using an air compressor, as I did, keep the pressure relatively low, and don't get too close with the nozzle. Too strong a burst and you could damage the fan or something else. After you've blown out all the dust, replace the access panel and battery, then power up the system. I'll wager that it runs much quieter (and cooler) than it did before. If your laptop is more than a year or two old, it's long overdue for such a cleaning. (Same goes for your desktop.) Don't wait until it's too late. And add a reminder to your calendar so you remember to do this again every couple months. Contributing Editor Rick Broida writes about business and consumer technology. , or try the treasure trove of helpful folks in the PC World Community Forums. Sign up to have the Hassle-Free PC newsletter e-mailed to you each week. To comment on this article and other PCWorld content, visit our Facebook page or our Twitter feed.In this guide I explain how to disassemble an Acer Aspire 5742 series laptop.
In my case I’m taking apart an Acer Aspire 5742-6682 model. Also, this guide will work for Acer Aspire 5742z. Make sure the computer is turned off before you start the disassembly process. Unlock and remove the battery. Remove two screws securing the hard drive/memory cover on the bottom. Lift up and remove the cover. Under the cover you’ll get access to the following components: – Both memory modules. The hard drive assembly secured by one screw located in the lower right part of the mounting bracket. Remove one screw securing the hard drive. Slide the hard drive assembly to the right to disconnect it from the motherboard. Lift up and remove the hard drive assembly. Acer Aspire 5742 comes with a regular 2.5″ SATA hard drive. This hard drive can be replaced with any other large capacity 2.5″ SATA HDD or 2.5″ SSD. Remove one screw securing the optical drive. Pull the optical drive to the right and remove it.
NOTE: in order to remove and replace the keyboard it is not necessary to go through the previous disassembly steps. Just follow instructions in steps 6-11. The keyboard secured to the top case by six spring loaded latches. In order to remove the keyboard it’s necessary to push on each latch with a small screwdriver and at the same time lift up the keyboard a little bit so the latch doesn’t lock back in place. After all latches unlocked you can insert your fingers under the keyboard (close to LCD screen) and start removing the keyboard. Continue removing the keyboard and place it upside down on the palmrest.The keyboard still connected to the motherboard. The keyboard cable connector located under the keyboard. Before you remove the keyboard it’s necessary to unlock the connector and release the cable. In the following two steps I explain how to unlock the keyboard connector. Very carefully move the retaining tab about 2 millimeters to the shown direction.

The retaining tab must remain connected to the connector base. On this picture the connector shown in the UNLOCKED position. Now you can pull the keyboard cable from the connector. Remove all screws from the bottom. Disconnect three cables from the motherboard (left to right): – Power button board cable. Disconnect the power button board cable and touchpad cable same way you disconnected the keyboard cable. Unlock the connector by moving the retainer about 2 millimeters to the shown direction. Pull cable from the connector. Here’s how to disconnect the speaker cable. Simply unplug it form the motherboard. Remove screws securing the top cover (palmrest) assembly. Start separating the top cover assembly from the bottom cover. Remove the top cover assembly. On the bottom side of the top cover assembly you can access the following components:I was very surprised to find out that Acer Aspire 5742 has only ONE speaker installed.